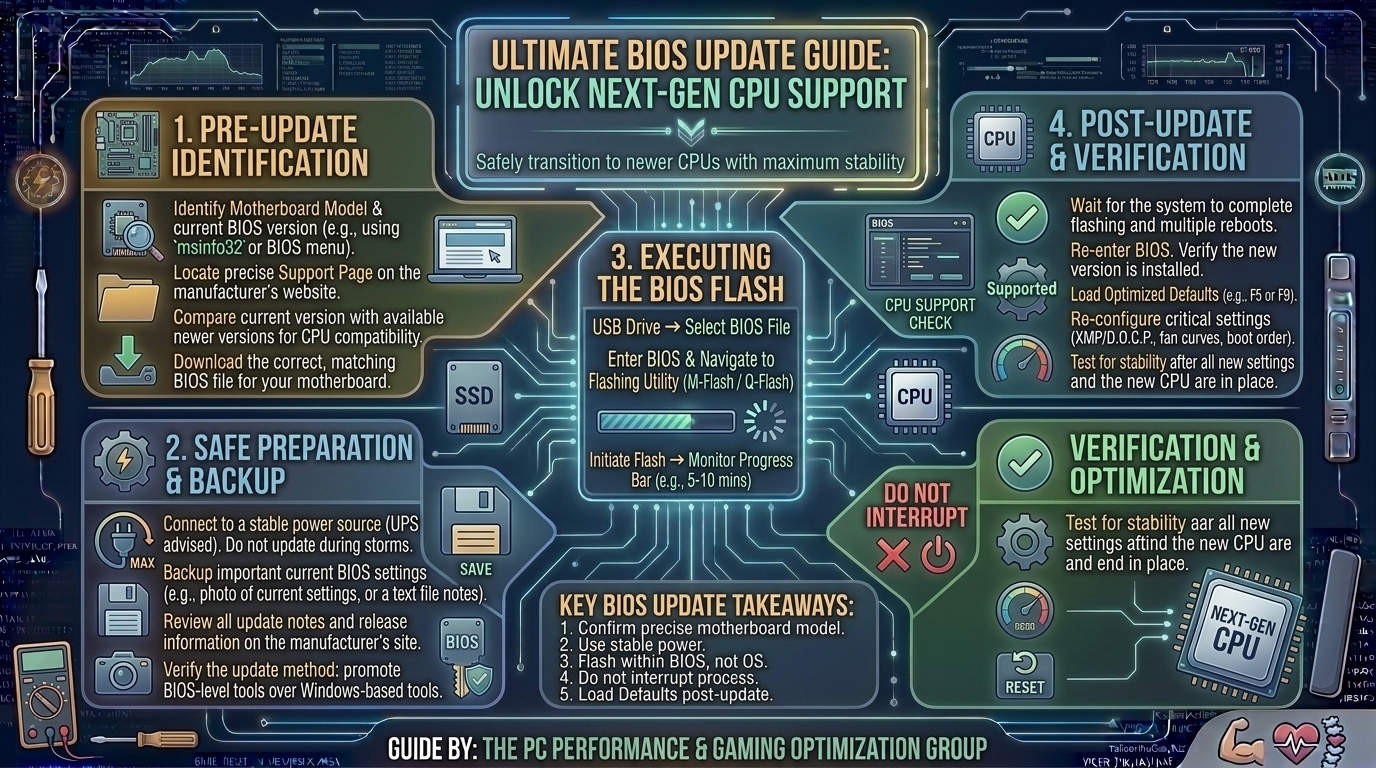
Upgrading your PC’s processor is one of the most cost-effective ways to unlock higher gaming framerates, smoother video rendering, and faster everyday system performance. However, physical socket compatibility (such as AMD’s AM4/AM5 or Intel’s LGA 1700/1851) does not automatically guarantee out-of-the-box system compatibility.
When motherboard manufacturers release a hardware platform, the microcode pre-installed on the Basic Input/Output System (BIOS) or Unified Extensible Firmware Interface (UEFI) chip only recognizes processors available at that exact time. If you drop a newer-generation CPU into an older motherboard, the system will usually fail to POST (Power-On Self-Test), leaving you with a blank screen or status LED errors.
Updating your motherboard BIOS microcode bridges this architectural gap. This guide details how to safely flash your motherboard firmware, avoid system bricking, and prepare your rig for a new CPU upgrade.
1. What Is a BIOS/UEFI Update and Why Is It Necessary for New CPUs?
The BIOS (or modern UEFI) is low-level firmware flashed directly onto a small ROM chip on your motherboard. It acts as the initial handshake between your core hardware components—such as your CPU, RAM, and storage devices—and your operating system.
+-------------------------------------------------------------+
|                     SYSTEM BOOT SEQUENCE                    |
+-------------------------------------------------------------+
| 1. Power On                                                 |
| 2. BIOS/UEFI Microcode Executes                             |
| 3. POST (Power-On Self-Test Checks Hardware & CPU ID)       |
| 4. Hardware Handshake Initialized                           |
| 5. OS Bootloader (Windows/Linux) Loads                      |
+-------------------------------------------------------------+
When processor manufacturers like AMD or Intel release new generations on an existing socket, the underlying microcode changes. Without updated firmware instructions:
- The Motherboard Cannot Identify the CPU ID: The BIOS halts during POST because it does not recognize the CPU instruction set.
- Voltage and Power Delivery Parameters Are Missing: Modern CPUs rely on dynamic voltage-frequency curves managed at the firmware level.
- Memory Controllers Fail to Initialize: Next-gen CPUs often introduce wider DDR4/DDR5 clock frequency support or tighter memory controller profiles.
2. Essential Pre-Update Precautions and Safety Checklist
Updating system firmware rewrites the foundational code governing your hardware. If power cuts out mid-process or the wrong firmware file is flashed, the motherboard can become corrupted or unbootable (“bricked”). Before proceeding, check off the following precautions:
- Uninterruptible Power Supply (UPS): If you live in an area prone to power flickers or storms, plug your PC into a UPS battery backup.
- Do Not Update via Windows Utilities: Always use your motherboard’s built-in UEFI flashing tool (e.g., ASUS EZ Flash, MSI M-Flash, Gigabyte Q-Flash) or USB Flashback. Flashing through Windows OS applications introduces OS crashes, background driver conflicts, and software hangs.
- Format Your USB Drive Correctly: Use a reliable, low-capacity USB 2.0 or USB 3.0 flash drive (8GB to 32GB) formatted to the FAT32 file system. Larger drives or non-FAT32 partitions (like NTFS or exFAT) may not be detected inside the UEFI environment.
- Save Current BIOS Profiles: Flashing firmware resets all customized settings to factory defaults. Take photos or write down your memory XMP/EXPO profiles, custom fan curves, resizeable BAR toggles, and RAID configurations.
- Disable BitLocker / Drive Encryption: If using Windows BitLocker, suspend protection or back up your 48-digit recovery key before updating. Firmware updates clear TPM (Trusted Platform Module) keys, which can trigger encryption lockouts.
3. How to Identify Your Current Motherboard Model and BIOS Version
Before downloading firmware, identify the exact model name, hardware revision number (Rev), and active BIOS version.
Method A: System Information (msinfo32)
- Press
Win + Ron your keyboard to open the Run prompt. - Type
msinfo32and hit Enter. - Under System Summary, locate BaseBoard Product (Motherboard Model) and BIOS Version/Date.
+--------------------------+----------------------------------+
| System Property          | Value Example                    |
+--------------------------+----------------------------------+
| System Manufacturer      | System manufacturer              |
| BaseBoard Manufacturer   | ASUSTeK COMPUTER INC.            |
| BaseBoard Product        | ROG STRIX B550-F GAMING (WI-FI)  |
| BIOS Version/Date        | American Megatrends Inc. 2423    |
+--------------------------+----------------------------------+
Method B: Command Prompt (CMD)
- Press
Win + S, typecmd, and launch Command Prompt. - Type the following command and press Enter:DOS
wmic bios get smbiosbiosversion - To view your motherboard model via CMD:DOS
wmic baseboard get product,Manufacturer,version
Method C: Physical Inspection
If your system does not currently boot, inspect the silkscreen printing directly on the motherboard surface between the PCIe slots or near the CPU socket. Look for revision codes (e.g., REV 1.0, REV 1.1, or REV 2.0), as different revisions frequently require entirely distinct BIOS files.
4. Step-by-Step Guide: Preparing the USB Flash Drive
- Insert your USB flash drive into your PC.
- Open File Explorer, right-click the USB drive, and select Format.
- Under File System, select FAT32.
- Set Allocation unit size to Default, check Quick Format, and click Start.
+-------------------------------------------------------------+
|                      USB FORMAT CHECK                       |
+-------------------------------------------------------------+
| File System   : FAT32 (Required for UEFI read capabilities) |
| Capacity      : 8GB - 32GB Recommended                      |
| File Structure: Root Level Directory (Unzipped/Extracted)   |
+-------------------------------------------------------------+
- Navigate to your motherboard manufacturer’s official support page:
- ASUS Support: official support portal
- MSI Support: official support portal
- Gigabyte / AORUS Support: official support portal
- ASRock Support: official support portal
- Search for your specific model.
- Open the CPU Support List to find the minimum BIOS version required for your new processor.
- Go to the BIOS / Firmware section, download the latest stable version (avoid Beta builds unless specifically required for CPU day-one support), and extract the downloaded
.ZIParchive. - Copy the raw BIOS file (e.g.,
.CAP,.ROM, or.BIN) directly to the root folder of your FAT32 USB drive. Do not place it inside nested folders.
5. How to Update BIOS Using the UEFI Utility (Standard Method)
Use this method if your current CPU is installed and working, and you are preparing the board for a new processor swap.
+-------------------------------------------------------------+
|               UEFI IN-BIOS UPDATE WORKFLOW                  |
+-------------------------------------------------------------+
| 1. Plug FAT32 USB into Rear I/O Panel                      |
| 2. Boot into UEFI (Press DEL or F2 during startup)          |
| 3. Navigate to Flash Tool (EZ Flash / M-Flash / Q-Flash)    |
| 4. Select BIOS File from USB Root Directory                 |
| 5. Confirm Update -> Wait 5-10 Mins -> Auto-Reboot          |
+-------------------------------------------------------------+
- Insert the USB Drive: Plug your prepared USB drive into a native USB port on the rear I/O panel of your motherboard (preferably a USB 2.0 port).
- Reboot to UEFI: Restart your PC. During the initial splash screen, tap the
Deletekey orF2continuously until the UEFI setup screen opens. - Locate Flashing Utility: Switch to Advanced Mode (
F7on most boards) and locate the built-in update tool:- ASUS:
Toolmenu ->ASUS EZ Flash 3 Utility - MSI: Click
M-Flashon the main screen (system will reboot into update mode) - Gigabyte: Press
F8or clickQ-Flash - ASRock:
Toolsmenu ->Instant Flash
- ASUS:
- Select Firmware File: Browse your FAT32 USB drive, select the target BIOS file, and click Open or press Enter.
- Confirm and Execute: The tool will verify the integrity of the file. Click Yes when prompted to confirm the update.
- Wait for Completion: The process will take approximately 3 to 10 minutes. The system may restart automatically several times. Do not turn off power, push buttons, or disconnect the USB drive during this time.
6. How to Update BIOS Without a CPU (USB BIOS Flashback)
If you purchased a motherboard that does not support your new-generation CPU out-of-the-box, and you do not have an older compatible processor to boot into the UEFI, you can use USB BIOS Flashback. This feature allows the motherboard micro-controller to flash the ROM chip directly using only power supply connections.
+-------------------------------------------------------------+
|             USB BIOS FLASHBACK HARDWARE SETUP               |
+-------------------------------------------------------------+
| [Power Supply] ---> Connect 24-Pin ATX & 8-Pin CPU Cables   |
| [Rear I/O]     ---> Insert USB into Designated Flash Port   |
| [Control]      ---> Press & Hold Dedicated Flashback Button |
| [Indicator]    ---> LED Flashes Fast (3-5 min) -> Turns Off |
+-------------------------------------------------------------+
Flashback Naming Conventions by Manufacturer
- ASUS: USB BIOS Flashback
- MSI: Flash BIOS Button
- Gigabyte: Q-Flash Plus
- ASRock: BIOS Flashback
Step-by-Step Flashback Execution
- Rename the BIOS File: Manufacturers require the BIOS file to be renamed to a specific filename for Flashback to detect it.
- Most downloads include a automatic renaming tool (e.g.,
BIOSRenamer.exe). - ASUS Example:
SB550FGW.CAPorcreative model string.CAP - MSI Example: Rename file to
MSI.ROM - Gigabyte Example: Rename file to
GIGABYTE.bin
- Most downloads include a automatic renaming tool (e.g.,
- Move File to FAT32 USB: Place the renamed file directly into the root directory of the FAT32 formatted USB drive.
- Connect Motherboard Power: Ensure the 24-pin ATX power cable and 8-pin CPU power cable from your Power Supply (PSU) are firmly connected to the motherboard. Flip the PSU rocker switch to the ON position (you do not need to power on the PC via case front panel).
- Locate Dedicated USB Flashback Port: Inspect the rear I/O panel. Look for the USB port surrounded by a white border or labeled BIOS, FLASHBACK, or Q-FLASH.
- Insert USB & Press Button: Plug the USB drive into that specific port. Hold down the physical BIOS Flashback Button on the rear I/O panel for 3 to 5 seconds until a small LED light starts flashing.
- Observe the Flashing LED:
- Slow Blink -> Fast Blink: Flashing cycle in progress.
- LED Turns Off: Update finished successfully (takes 4–8 minutes).
- Solid Light / No Blink: Error occurred (file renamed incorrectly, USB not FAT32, or unsupported drive).
7. Motherboard Brand-Specific Breakdown
| Manufacturer | Integrated Flash Tool | Button-less Update Method | Required File Extension | Key Notes & Tips |
| ASUS | EZ Flash 3 | USB BIOS Flashback | .CAP | Use included BIOSRenamer.exe before Flashback. |
| MSI | M-Flash | Flash BIOS Button | .ROM (for Flashback) | Renaming to MSI.ROM is mandatory for button execution. |
| Gigabyte | Q-Flash | Q-Flash Plus | .bin / Vendor Ext | Ensure USB is inserted in labeled port; remove RAM if stuck. |
| ASRock | Instant Flash | BIOS Flashback | .ROM / Vendor Ext | Requires USB 2.0 port for optimal Flashback execution. |
8. Post-Update Actions and CPU Installation
Once the update finishes and your system reboots, complete these follow-up steps:
- Perform Physical CPU Swap: Power down your system completely, disconnect the AC power wall cord, press the PC power button once to discharge residual capacitors, swap out your old CPU for the new generation processor, reapply thermal paste, and reinstall your cooler.
- Verify POST and BIOS Recognition: Turn on your PC. The initial boot cycle after a BIOS update and CPU change can take up to 2–3 minutes due to memory training (especially on DDR5 platforms). Enter UEFI setup and verify that your new CPU model and correct core counts are displayed on the main screen.
- Re-Enable Memory XMP/EXPO Profiles: A BIOS update resets RAM clocks to JEDEC base speeds (e.g., 4800MHz or 2133MHz). Re-enable XMP (Intel) or EXPO (AMD) to run your RAM at its advertised rated speeds.
- Re-Configure Boot Priority and Security: Set your OS drive (e.g., Windows Boot Manager / NVMe SSD) as primary boot target. Re-enable TPM / Secure Boot if required for Windows 11.
- Run Stability Tests: Boot into your desktop environment and check CPU temperatures and clock speeds using tools like HWiNFO64 or CPU-Z. Run a stress test (like Cinebench or Prime95) for 10–15 minutes to verify system stability under heavy multi-threaded loads.
9. Troubleshooting Common BIOS Update Errors
+-----------------------------------------------------------------------+
|                       TROUBLESHOOTING FLOWCHART                       |
+-----------------------------------------------------------------------+
| System Fail to Boot / Blank Screen?                                   |
|   |                                                                   |
|   +---> 1. Perform CMOS Reset (Bridge CLRTC pins / Remove CR2032)     |
|   +---> 2. Reseat RAM Modules (Test with single stick in Slot A2)     |
|   +---> 3. Check Motherboard Debug LEDs (CPU / DRAM / VGA)            |
|   +---> 4. Re-Flash BIOS via Flashback using different USB 2.0 Drive |
+-----------------------------------------------------------------------+
Issue A: Computer black screens / turns on but will not POST after update
- Cause: Corrupted CMOS settings or memory training failure.
- Solution: Clear CMOS memory. Unplug the PSU wall power. Remove the silver CR2032 coin-cell battery from the motherboard for 5 minutes, or bridge the 2-pin
CLEAR_CMOS/CLRTCheaders with a metallic screwdriver tip for 10 seconds. Reinsert battery and power on.
Issue B: “Selected File is Not a Proper BIOS File” Error
- Cause: Mis-matched hardware revision, wrong motherboard model downloaded, or corrupted extraction.
- Solution: Re-verify your motherboard revision number (e.g., Rev 1.0 vs. Rev 2.0). Download the BIOS file strictly matching your exact board revision.
Issue C: Flashback LED flashes three times, then stays solid red/green
- Cause: The motherboard Flashback controller cannot find or read the file.
- Solution: Re-format the USB drive to FAT32 using MBR (Master Boot Record) partition scheme rather than GPT. Ensure the BIOS file is renamed properly and placed at root level without folders.
10. Frequently Asked Questions (FAQ)
1. Can a BIOS update damage or brick my motherboard?
Yes, if power is interrupted while the chip is actively being written, or if an incorrect file is forced onto the board, the BIOS firmware can corrupt. Using an Uninterruptible Power Supply (UPS) and double-checking your model number reduces this risk significantly.
2. Do I need to update through every single older BIOS version sequentially?
In most cases, no—you can update directly from a very old version to the newest version. However, check the motherboard download page notes. If a specific version serves as a “bridge BIOS” (requiring installation before updating further), the manufacturer will highlight it in bold text.
3. Will updating the BIOS erase my personal files, photos, or games?
No. The BIOS resides on a dedicated ROM chip on the motherboard. It is completely separate from your storage drives (SSDs, NVMe, HDDs) where Windows and personal data are stored.
4. How long does a typical BIOS flash process take?
Between 3 to 10 minutes. Do not restart or cut power even if the progress bar seems to pause temporarily around 99%.
5. Can I use a new generation CPU to update the BIOS if the system won’t POST?
Only if your motherboard supports USB BIOS Flashback (updating without a functional CPU/RAM installed). If your board lacks this hardware feature, you must temporarily install an older generation compatible CPU to access the UEFI setup and run the update.
6. Why won’t my motherboard detect my USB drive inside the BIOS tool?
The USB drive is likely formatted in exFAT or NTFS file systems instead of FAT32, or it exceeds partition size limits. Reformat the drive using FAT32 with a capacity under 32GB.
7. Should I update my BIOS if my current CPU is already working fine?
If your system is stable and you are not upgrading processors or fixing specific security vulnerabilities, a BIOS update is generally unnecessary. Firmware updates should primarily be performed for hardware compatibility upgrades, microcode patches, or system bug resolutions.
8. Will updating the BIOS improve gaming performance or FPS?
Typically, BIOS updates only deliver minor performance variances unless they patch microcode scheduling inefficiencies or enable features like Resizable BAR and Memory Overclocking (XMP/EXPO).
9. What should I do if the power goes out while updating BIOS?
If your board features Dual BIOS or USB BIOS Flashback, you can recover the board by running the Flashback process again via USB. If your board has neither feature and fails to POST, it will require physical chip reprogramming or RMA warranty replacement.
10. Does updating the BIOS remove my CPU or memory overclocking profiles?
Yes. A firmware update clears custom voltage configurations, fan profiles, and memory timings back to factory defaults. You will need to re-apply your settings manually after the update completes.
Updating your motherboard BIOS is an easy way to extend the operational lifespan of your desktop system. By double-checking your hardware model, maintaining stable power, formatting your USB drive to FAT32, and utilizing native UEFI tools or Flashback features, you can safely install new-generation processors onto your existing platform without risk. Ensure you document your custom settings beforehand, clear your CMOS if POST issues occur, and verify system stability once back inside your operating system.
Leave a Reply