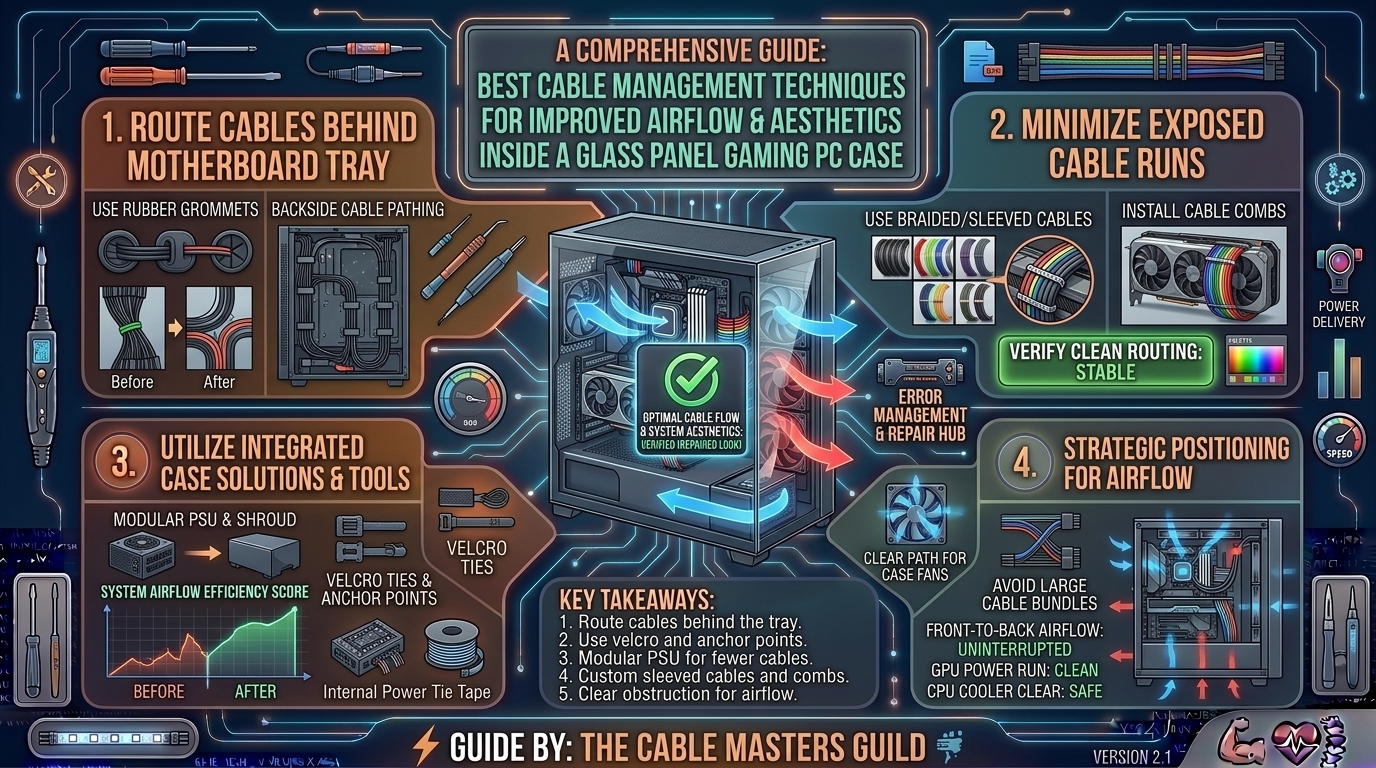
What Are the Best Cable Management Techniques to Improve Airflow and Aesthetics Inside a Glass Panel Gaming PC Case?
The evolution of modern PC building has turned desktop computers into glowing works of art. With the dominance of panoramic tempered glass cases (such as the Lian Li O11 Dynamic, HYTE Y60, and NZXT H-series), every single component—and every single wire—is fully visible from across the room.
However, building a gorgeous showcase rig comes with a major challenge: cable management.
Poorly routed cables do more than ruin the visual appeal of a clean build; they act as physical barriers inside your case, disrupting laminar airflow, creating thermal dead zones around the motherboard and GPU, and causing system temperatures to spike. Mastering internal cable management is the ultimate intersection of high performance and pristine aesthetics.
This exhaustive guide covers advanced cable routing strategies, hardware selection rules, specialized tools, and step-by-step techniques to optimize airflow and achieve a flawless, wire-free look behind glass panels.
1. Why Cable Management Matters for Airflow and Thermals
Many builders treat cable management as a cosmetic afterthought. In reality, it plays a critical role in fluid dynamics inside a computer chassis.
+-------------------------------------------------------------------------+
|                  AIRFLOW RESISTANCE VS LAMINAR FLOW                     |
+-------------------------------------------------------------------------+
| Messy Build (Turbulent Dead Zones)                                     |
|   ├─► Rats' nest of thick cables blocking front/bottom intake fans       |
|   └─► Trapped stagnant heat pockets around VRMs, RAM, and GPU backplate |
|                                                                         |
| Optimized Build (Laminar Airflow Stream)                                |
|   ├─► Unobstructed channels from intake fans directly to components     |
|   └─► Lower core temps, lower fan RPMs, and zero visual clutter          |
+-------------------------------------------------------------------------+
- The Obstruction Problem: Unmanaged 24-pin ATX cables, stiff braided power cables, and dangling fan splitters hanging loose in the main chamber block cool air coming from front or bottom intake fans. This forces fans to spin faster, increasing noise levels.
- Hotspot Generation: Airflow stagnation around power delivery components (VRMs), M.2 NVMe drives, and the back of graphics cards leads to localized heat buildup. Clearing paths with proper routing drops system temps by several degrees.
2. Essential Hardware Choices for a Clean Glass Panel Build
Achieving a clean look starts long before you plug in your first wire. Selecting the right hardware layout makes cable management effortless.
+-------------------------------------------------------------------------+
|                 HARDWARE SELECTION ARCHITECTURE                         |
+-------------------------------------------------------------------------+
| [X] Fully Modular Power Supply (PSU) - Only use necessary cables        |
| [X] Back-Connect Motherboards (ASUS BTF / MSI Project Zero)             |
| [X] Custom Braided Cable Extensions or Individually Sleeved Cables      |
| [X] Dual-Chamber Case Design (Hides PSU and excess slack in rear chamber)|
+-------------------------------------------------------------------------+
1. Fully Modular Power Supplies
Never use non-modular or semi-modular power supplies in a glass panel build. A fully modular PSU lets you plug in only the exact power cables you need (e.g., one 24-pin, one CPU 8-pin, and one GPU cable), eliminating a massive bundle of unused wires that you would otherwise have to stuff into the basement shroud.
2. Back-Connect Ecosystems (ASUS BTF & MSI Project Zero)
The latest revolution in PC building is hidden-connector technology. Motherboards like the ASUS BTF (Back To the Future) and MSI Project Zero series move all power headers, fan headers, front panel connections, and the massive 24-pin cable directly to the back of the motherboard. Combined with a compatible case, this results in a completely cable-free main chamber view.
3. Dual-Chamber and Wide-Body Cases
Dual-chamber cases allocate a separate compartment behind the motherboard tray specifically for the power supply, hard drive cages, and excess cable length. This splits your build into a pristine display chamber on the front and a functional utility room in the back.
3. Step-by-Step Advanced Cable Routing Techniques
Follow this structured workflow to route your internal cables cleanly and maintain open airflow pathways.
Phase 1: Planning and Staging
- Map Your Paths: Before screwing anything down, hold your primary cables up to the motherboard headers to measure the shortest, most direct route through the nearest rubber grommet or cut-out.
- Prioritize Thickness: Thick cables—especially the stiff 24-pin main motherboard power cable and bulky GPU 12VHPWR cables—must be routed first because they require the most space behind the motherboard tray.
Phase 2: Utilizing the Motherboard Tray and Tie-Downs
- Anchor to Tie-Down Points: Modern cases feature stamped steel loops and channels on the back of the motherboard tray. Use reusable Velcro straps rather than plastic zip ties to bundle cables along these channels. Velcro allows for effortless adjustments during future upgrades.
- The “Crossing” Rule: Never cross power cables diagonally across the back tray if you can avoid it. Run them vertically along the main central channel or horizontally along the top/bottom edges.
Phase 3: Shortest-Distance Pass-Throughs
- The 24-Pin ATX Cable: Route this through the side rubber grommet closest to the connector. Pull just enough slack through so there is no tension, but avoid leaving a loop hanging out.
- The GPU Power Cable: If mounting horizontally, route the PCIe or 12VHPWR cable upward through the bottom shroud cut-out directly beneath the graphics card. This keeps the cable tight against the card and completely out of the path of side or front intake fans.
- CPU 8-Pin Power Cables: Route these straight up through the uppermost cut-outs near the top edge of the motherboard before securing the motherboard to the standoffs. Trying to thread a thick CPU cable after a large CPU air cooler is installed is nearly impossible.
4. Summary Table: Cable Management Tools & Accessories
| Tool / Accessory | Primary Purpose | Aesthetics Impact | Airflow Impact |
| Velcro Cable Straps | Bundling wires cleanly in the rear chamber | High (Reusable & neat) | Neutral |
| Custom Cable Combs | Aligning individual wires in custom braided kits | Maximum (Clean parallel lines) | Neutral |
| 90-Degree Adapters | Directing GPU/Motherboard cables flush | High (Hides awkward bends) | High (Clears fan paths) |
| PWM Fan Hub / RGB Controller | Centralizing dozens of small fan/LED wires | Maximum (Eliminates spaghetti) | High (Clears main chamber) |
5. Pro-Tips for Managing Fan and RGB “Spaghetti”
The biggest challenge in modern RGB-heavy builds isn’t power cables—it’s managing the dozens of tiny fan power wires, PWM splitter cables, and 3-pin ARGB headers.
- Invest in a Powered Hub: Instead of daisy-chaining multiple fan cables across your motherboard, mount a centralized PWM fan and ARGB hub (such as units from Corsair, NZXT, or Arctic) directly to the back of the motherboard tray. This reduces 6 separate fan wires down to a single header connection.
- Tuck Excess Slack Behind Drive Cages: If a fan cable is 60cm long and your header is 10cm away, do not leave a coiled loop in the main case. Fold the excess cable accordion-style, secure it with a small twist tie or velcro wrap, and tuck it deep inside the basement power supply shroud.
- Use 90-Degree Adapters: For tight spaces where a 24-pin cable or USB 3.0 header bends sharply against a side glass panel, use low-profile 90-degree adapters. They keep wires hugging the PCB surface.
6. Frequently Asked Questions (FAQ)
1. Does messy cable management actually increase PC temperatures?
Yes. A tangled ball of thick cables directly in front of intake fans acts as a physical wall, creating turbulent dead zones that restrict airflow. Clearing these pathways can lower GPU and CPU temperatures by 2°C to 5°C under heavy gaming loads.
2. What is the difference between a modular and non-modular power supply for cable management?
A non-modular power supply has all of its cables permanently attached. This forces you to cram unused cables (like legacy SATA and extra PCIe lines) into the bottom of your case. A fully modular power supply lets you detach every single unused wire, leaving your case completely free of clutter.
3. Are zip ties or Velcro straps better for PC cable management?
Velcro straps are vastly superior for most builders because they are reusable. If you need to upgrade a component or swap a cable, you simply unlatch the Velcro. Plastic zip ties require cutting with wire snips, which risks accidentally slicing a cable jacket if you aren’t careful.
4. How do I route cables cleanly if my PC case has very little space behind the motherboard tray?
If your case offers less than 20mm of clearance behind the motherboard tray, avoid crossing cables over one another. Lay them flat in single-file lines using dedicated routing channels, and use custom thin silicone cables instead of bulky braided sleeves.
5. What are back-connect motherboards and do they require a special case?
Back-connect motherboards (like ASUS BTF or MSI Project Zero) feature all power headers and front-panel pins on the rear of the board. Yes, they require a compatible case that features matching cut-outs aligned with those rear headers.
6. How can I hide the ugly 24-pin motherboard cable?
You can use individual sleeved cable extensions (from brands like CableMod) with transparent cable combs to align the wires neatly, or transition to a back-connect ecosystem where the 24-pin cable is completely hidden behind the motherboard tray.
7. Do custom cable extensions affect power delivery or cause stability issues?
High-quality, reputable cable extensions do not affect power delivery. However, avoid extremely cheap, unbranded extension kits, as thin copper gauge wire or loose pins can introduce electrical resistance and voltage drop under heavy loads.
8. How do I manage the massive 12VHPWR cable for modern RTX graphics cards without bending it too sharply?
The NVIDIA 12VHPWR / 12V-2×6 power cable must not be bent sharply within 35mm of the connector to prevent loose terminal contact. Use a wide-radius curve, or purchase a right-angle 90-degree adapter/cable directly from your power supply manufacturer.
9. Should I route fan cables before or after installing the motherboard?
You should plan your routing paths before screwing down the motherboard, but plug in smaller fan and front-panel headers immediately after mounting the board, as larger components like CPU air coolers or graphics cards will block your hands later.
10. How do I keep the back of my PC case looking clean even if nobody sees it?
Treat the back of the motherboard tray like a circuit board layout. Group power cables together, route data lines separately to avoid electromagnetic interference, and anchor every single wire to the case’s factory tie-down loops. A clean back chamber makes future troubleshooting significantly easier.
Mastering cable management inside a glass panel gaming PC case transforms your system from a cluttered electronic mess into a sleek, professional showcase. By utilizing modular power supplies, anchoring wires with Velcro straps, keeping intake channels clear of obstructions, and leveraging modern routing cut-outs, you ensure optimal laminar airflow, lower thermal limits, and jaw-dropping aesthetics.
Leave a Reply