What Are the Best Map Callouts and Positioning Angles to Hold Choke Points on Competitive Multiplayer Maps
Welcome to The Gamer Buzz, your premier competitive tactical hub. Whether you are climbing the ranked ladders from the high-performance gaming setups of San Francisco, New York, and Seattle, or locking down map control across Texas, California, and Washington, one rule of competitive multiplayer games remains absolute: map control wins rounds.
In tactical first-person and hero shooters (such as Counter-Strike 2, Valorant, Rainbow Six Siege, or Overwatch 2), maps are defined by architecture. Specifically, they are structured around choke points—narrow hallways, doorways, courtyards, and tunnels that attacking teams must push through to reach objectives. Knowing how to name these areas cleanly and holding the correct defensive angles dictates whether you stop a rush or gift the enemy an easy site take.
In this exhaustive, master-level guide, we break down standard map callout architecture, the geometry of optimal holding angles, crosshair placement theory, and advanced strategies to lockdown competitive choke points effortlessly.
1. The Geometry of Holding Choke Points: Active vs. Passive Angles
When defending a critical choke point, your positioning determines your survival rate. Most players fall into the trap of standing completely exposed in the middle of a doorway, acting as an easy target for pre-firing attackers.
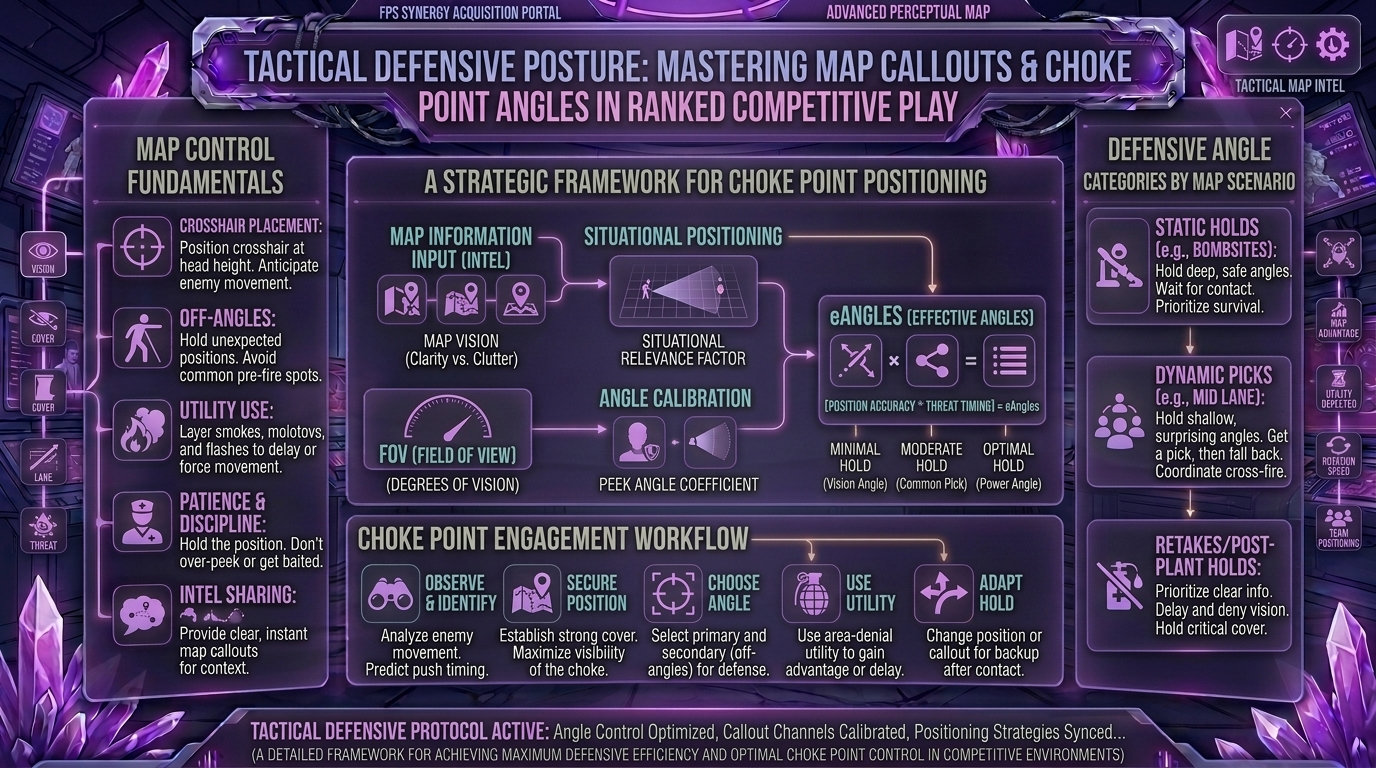
Mastering map geometry requires understanding three primary holding angles:
1. The Advantage of Distance (The Pyramidal Peek)
- The Physics: The player standing further back from a corner or doorway sees the enemy sooner than the approaching player sees them, thanks to perspective geometry and field-of-view arcs.
- Application: Never press your back flat against the wall immediately next to a choke point doorway. Step back 3 to 5 meters. This gives you a wider vision cone into the corridor while making your body a much smaller, harder-to-hit target for anyone entering.
2. Crossfire Setups (The 90-Degree Principle)
- A single defender holding a choke point can easily be overwhelmed by utility or traded out by a standard dual-peeking entry duo.
- The Solution: Establish crossfires with a teammate. Position yourselves so that if an enemy peeks the choke point, they are forced to choose between looking at Player A or Player B—exposing their side or back to whichever teammate is not being looked at.
3. Off-Angles (Breaking Pre-Aim Expectations)
- Good attackers pre-aim standard headshot angles automatically. An off-angle is any non-standard position—such as standing out in the open near a weird box, crouching tightly against a shadow, or hugging an unconventional corner.
- Use off-angles sparingly; they rely on psychological element-of-surprise and will lose effectiveness if used every single round.
2. Standardized Callout Architectures in Competitive Maps
If your team does not speak the same language when reporting enemy movements, coordination collapses. Professional map callouts generally follow standard logical naming conventions based on geography, architecture, and color coding.
The Universal Callout Blueprint
- Spawns and Yards: Areas where teams originate (T-Spawn, CT-Spawn, Defender Yard).
- Cardinals and Landmarks: Structural features that immediately identify an area (Blue Container, Red Garage, Church, Market, Generator).
- Elevations: Verticality indicators (Catwalk, Heaven, Rafters, Nest, Underpass, Basement).
- Routes: Direct transit corridors (Main, Short, Long, Banana, Alley, Connector).
3. Step-by-Step Protocol for Locking Down a Choke Point
When the round timer hits zero and the enemy team executes their strategy, holding a choke point requires a calm, disciplined 4-stage execution:
[Phase 1: Early Info Gathering] ➔ [Phase 2: Utility Delay] ➔ [Phase 3: Crossfire Discipline] ➔ [Phase 4: Fallback / Retake]
Phase 1: Early Info Gathering (0:00 to 1:30)
- Do not waste utility or give away your position immediately. Use passive camera placement, sound cues, or quick peek-information lines to see if the enemy is committing resources to your site or faking elsewhere.
Phase 2: Utility Delay (Executing the Slowdown)
- When you hear footsteps or see utility landing (smokes, flashbangs, stun grenades), do not panic-spray through the smoke blindly.
- Drop delay utility—such as incendiary grenades, molotovs, or area-denial traps—directly into the mouth of the choke point to stall their momentum and force them to take burn damage or rotate.
Phase 3: Crossfire Discipline & Trigger Control
- Hold your crosshair locked at head height, pre-aiming the exact pixel where an enemy’s head will clear the wall frame.
- Do not fire at the first pixel of an arm or shoulder. Wait for the core body or head to cross your crosshair before unleashing a controlled burst.
Phase 4: Recognizing When to Fall Back
- If the enemy executes a full five-man crunch with coordinated utility dumps, flashing your position and smoking you out, do not try to hero-clutch against odds. Fall back to a secondary containment site, preserve your weapon for the economy, and wait to execute a team retake alongside your surviving rotators.
4. Advanced Defensive Tactics: Controlling Choke Points Matrix
| Choke Point Type | Primary Threat | Recommended Defense Strategy | Best Utility Response |
| Wide Open Courtyards | Snipers, long-range rifles | Hold tight cover, use smoke walls to break sightlines | Smokes to split vision, flashes to cross safely |
| Narrow Indoor Corridors | Shotguns, spray weapons, rushes | Play off-angles, hold crossfires, maintain distance | Molotovs/Incendiaries to block entry floors |
| Vertical Multi-Tier Ramps | Aerial movement, high-ground peeks | Split crosshairs between upper and lower thresholds | Slow traps, concussion fields, or direct stun utility |
10 Frequently Asked Questions (FAQ)
1. What is the most common mistake players make when holding a choke point?
Peeking aggressively as a defender. As the defending team, attackers must come to you. Holding a passive, disciplined angle forces them to push into your crosshair.
2. Should I always crouch-peek or crouch-hold a choke point angle?
No. Crouching locks your movement speed to zero and lowers your head directly into standard standing crosshair pre-aim positions, making you an easy target.
3. How do I communicate callouts clearly when my team is panicking?
Keep your calls short and factual. Use the 4-part callout structure: [Number] + [Location] + [Status] (e.g., “Two pushing cat, one tagged 50”).
4. What is a “default setup” in tactical shooters?
A default setup is a standard map distribution where defenders spread out across map lanes to safely gather information and prevent early fast rushes before committing to rotations.
5. How do I counter an enemy team that executes a heavy utility push on a choke point?
Use delaying utility to stall them, and if the pressure becomes overwhelming, concede map space cleanly instead of feeding consecutive individual deaths.
6. Are off-angles better than standard headshot angles?
Off-angles are situational tools used to catch enemies off-guard once or twice per match. Standard angles are fundamentally safer because your cover is closer for an instant retreat.
7. How does weapon choice affect my ability to hold a choke point?
Submachine guns and shotguns excel at holding tight, narrow corridors, while assault rifles and sniper rifles dominate long-range open courtyards and choke entryways.
8. What should I do if a teammate blocks my retreat path while holding a choke point?
Always maintain situational awareness of your teammates’ positions. Politely call out spacing over voice chat (“Get behind me, don’t crowd this door”).
9. Why do professional players look at walls or floors while waiting for a push?
They are hiding their crosshair placement and vision cones from potential wall-bang angles or flashes, snapping their crosshairs back to the corner only when audio cues indicate an enemy is swinging.
10. Where can I find more map guides and pro callout breakdowns?
Bookmark The Gamer Buzz and check back regularly for our comprehensive database of professional strategy guides, map breakdowns, and competitive tactical tips!
Conclusion
Mastering map callouts and positioning angles to hold choke points is the ultimate separator between disorganised casual lobbies and elite tactical teams. By understanding distance geometry, setting up effective crossfires, maintaining strict utility discipline, and communicating with clean, concise callouts, you will lock down objectives and watch your win-rate skyrocket. Gear up, learn those map layouts, and dominate your next competitive match!
Leave a Reply