How to Test Your Computer RAM Stability Using MemTest86 to Check for Errors Causing Game Crashes
Random crashes to desktop (CTD) without an error code, micro-stutters during open-world asset streaming, and infamous Blue Screen of Death (BSOD) stop codes like MEMORY_MANAGEMENT or IRQL_NOT_LESS_OR_EQUAL are classic indicators of unstable system RAM. When high-speed gaming workloads write data to corrupt memory addresses or unstable XMP/EXPO overclocked cells, your operating system forcefully terminates the process to prevent file corruption.
Because Windows OS overhead and background services can mask underlying memory faults, testing RAM stability requires a bare-metal diagnostic environment. PassMark MemTest86 operates directly from a bootable USB flash drive, bypassing Windows entirely to execute rigorous algorithmic write-and-read patterns across every block of your DDR4 or DDR5 RAM.
This comprehensive guide breaks down memory error mechanics, step-by-step MemTest86 setup workflows, how to read test results, and practical troubleshooting steps to stabilize your gaming PC.
Diagnostic Overview: Symptoms of RAM Instability
| Symptom | Primary Memory Cause | Verification Step |
| Instant Crash to Desktop (No Error) | Corrupted memory address hit during active gameplay. | Run MemTest86 Pass 1–4. |
BSOD: MEMORY_MANAGEMENT | Windows kernel detected invalid page allocation. | Check for individual failing RAM sticks. |
BSOD: IRQL_NOT_LESS_OR_EQUAL | Memory address read failure caused by unstable XMP/EXPO. | Disable XMP/EXPO in BIOS; re-test. |
| Corrupted Game File Downloads | Bad RAM corrupting compressed files during decompression. | Check MemTest86 Test 6 & 7 (Block Moves). |
| System Freezes During Heavy Multitasking | Memory voltage drop (VDDQ/VDD) under high load. | Adjust SoC/DRAM voltages in BIOS. |
1. Why MemTest86 Is Necessary (Bare-Metal vs. Windows Diagnostic Tools)
Running memory diagnostics inside Windows (such as Windows Memory Diagnostic or software stress utilities) presents a major limitation: Windows locks a significant portion of physical RAM for OS kernel operations, page tables, and hardware drivers. Software running inside the operating system cannot directly touch locked memory blocks.
OPERATING SYSTEM TESTING (In-Windows):
[ Windows OS Kernel (Locked Memory) ] ---> Cannot Test ~2-4GB of System RAM

BARE-METAL MEMTEST86 (Bootable USB):
[ MemTest86 Micro-Kernel ] ---> Tests 100% of Physical RAM Addresses Directly
MemTest86 boots into its own lightweight UEFI micro-kernel before Windows loads. This grants the diagnostic engine total access to 100% of your installed RAM, allowing it to blast complex bit patterns across memory banks, cache levels (L1/L2/L3), and integrated memory controllers (IMC).
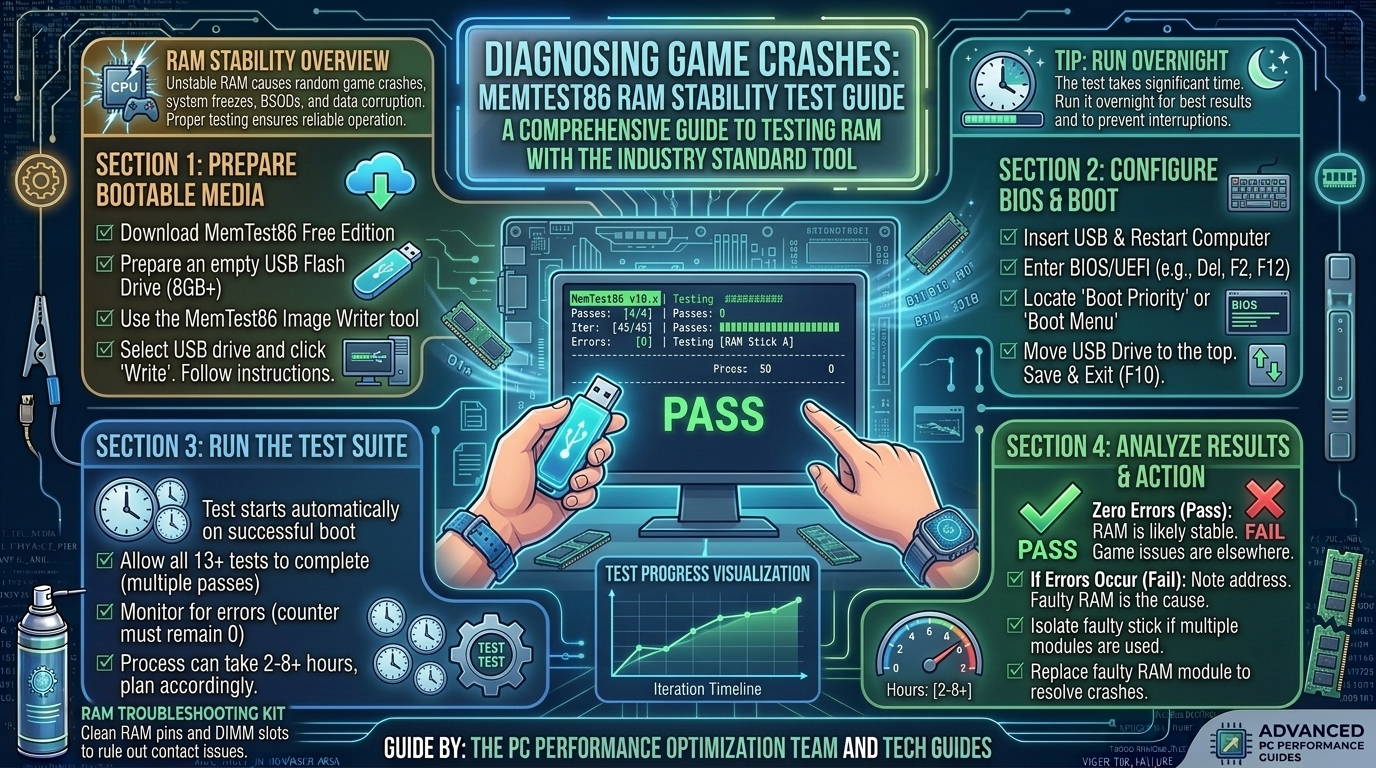
2. Step-by-Step Guide: Creating a Bootable MemTest86 USB Drive
1.Prepare Hardware & Backup USB Data:Requires a blank USB drive (512MB or larger).
Insert your USB flash drive into your PC. Important: Backup any critical files on the drive, as the image creation process will format the flash drive completely.
2.Download the Official MemTest86 Image:Free version supports DDR4 & DDR5 UEFI systems.
Download the official MemTest86 Free Edition zip archive from PassMark. Extract the zip file contents to a folder on your desktop.
3.Execute ImageUSB Utility:Included inside the extracted folder.
Open imageusb.exe as Administrator. Select your USB flash drive from the drive target list, ensure Write image to USB drive is selected, click Write, and accept the format warnings.
4.Boot Into MemTest86 via UEFI BIOS:Restart your PC and trigger your Boot Menu key.
Reboot your computer. During the splash screen, tap your motherboard’s Boot Menu key (F11 for MSI/ASRock, F12 for Gigabyte, F8 for ASUS). Select the UEFI: [USB Drive Name] partition to boot directly into MemTest86.
3. Understanding MemTest86 Test Execution and Error Isolation
Once booted, MemTest86 will automatically begin its standard automated suite of 13 algorithmic tests (ranging from Address Test to Moving Inversions and Bit Fade tests).
TESTING PASS REQUIREMENT:
Standard Pass  : 4 Full Passes (Zero Errors Allowed)
Duration       : 2 to 4+ Hours depending on RAM capacity & speed
Target Result  : 0 Errors (Even 1 single error indicates hardware instability)
What a Single Error Means:
Memory testing is binary: there is no acceptable threshold of errors. A single reported error in MemTest86 means that data written to a specific memory cell was altered upon retrieval. In gaming, that single flipped bit corrupts a texture file, a player position variable, or a display driver instruction—triggering an instant game crash.
4. Step-by-Step Isolation Protocol for RAM Errors
If MemTest86 detects errors during its run, follow this procedure to pinpoint whether the cause is a defective physical stick, bad DIMM slot placement, or an unstable motherboard profile:
[ Error Detected in MemTest86 ]
               |
               v
1. Disable XMP / EXPO / DOCP in BIOS ---> Re-test in MemTest86
               |
      +--------+--------+
      |                 |
(Passes at Stock)  (Fails at Stock)
      |                 |
      v                 v
Overclock / Voltage  Isolate Hardware: Test individual RAM sticks
Instability         in Slot 2 (A2) one at a time.
- Disable XMP / EXPO / DOCP Profiles: High-speed RAM profiles (e.g., DDR5 6000MHz+ or DDR4 3600MHz+) represent an automatic factory overclock. Revert your BIOS settings to default JEDEC stock speeds (e.g., 4800MHz for DDR5 or 2133/2666MHz for DDR4). Re-run MemTest86. If errors disappear, the issue is memory controller voltage instability rather than physically broken hardware.
- Test RAM Sticks Individually: Power down your PC, switch off the PSU, and remove all RAM modules except one stick in slot A2 (typically the second slot from the CPU socket). Run MemTest86. Repeat this process individually for every stick to isolate the exact failed module.
- Inspect Physical Contacts & Slots: Clean the gold contacts of the failing RAM stick using 99% Isopropyl Alcohol and check for dust inside the motherboard DIMM slots.
Frequently Asked Questions (FAQ)
Q1: How long does a full MemTest86 test take?
A: A complete 4-pass test typically takes between 2 to 5 hours, depending on your RAM capacity (16GB vs. 64GB), memory generation (DDR4 vs. DDR5), and CPU core speed.
Q2: Is one error in MemTest86 really a big deal?
A: Yes. A single error confirms data corruption. While your PC might boot into Windows normally, that corrupted memory address will eventually cause game crashes, blue screens, or silent file corruption.
Q3: Does MemTest86 support modern DDR5 RAM and Intel/AMD platforms?
A: Yes. The current UEFI version of MemTest86 fully supports DDR5 modules, XMP 3.0, AMD EXPO, and modern multi-core CPU architectures.
Q4: What is the difference between XMP and EXPO?
A: XMP (Extreme Memory Profile) is Intel’s memory overclocking standard. EXPO (Extended Profiles for Overclocking) is AMD’s open standard optimized for Ryzen processors. Both push RAM beyond base JEDEC specs and can cause instability if motherboard BIOS voltages are not tuned correctly.
Q5: Can bad RAM cause games to crash without showing a Blue Screen (BSOD)?
A: Absolutely. Most modern games crash silently to the desktop when a memory read operation fails, as the game engine terminates itself before Windows triggers a kernel panic.
Q6: What should I do if my RAM fails at XMP/EXPO speeds but passes at stock speeds?
A: Update your motherboard BIOS to the latest version (which improves memory training and stability microcode). If instability persists, manually bump CPU VDDQ/SoC voltage slightly or drop memory frequency down by one step (e.g., from 6000MHz to 5800MHz).
Q7: Can a bad CPU memory controller cause MemTest86 errors?
A: Yes. The Integrated Memory Controller (IMC) resides inside the CPU. If the IMC receives insufficient voltage or is pushed beyond its silicon limits by extreme RAM overclocks, MemTest86 will report errors even if the RAM sticks themselves are functional.
Q8: Should I run MemTest86 with CPU overclocks enabled?
A: No. When isolating RAM faults, disable all manual CPU overclocks and Precision Boost Overdrive (PBO) settings to ensure CPU core instability does not mimic memory errors.
Q9: What is the Hammer Test (Test 13) in MemTest86?
A: Test 13 repeatedly accesses adjacent memory rows in rapid succession to check for Rowhammer vulnerabilities—where electrical charge leakage in high-density RAM chips alters neighboring bit states.
Q10: If a RAM module is defective, can it be fixed with software?
A: No. Physical hardware errors (failed DRAM ICs or damaged trace circuitry) cannot be fixed via software. Defective RAM sticks must be replaced via manufacturer warranty (RMA).
Conclusion
Diagnosing system stability with MemTest86 provides a definitive, bare-metal verdict on whether unstable RAM is causing your PC game crashes. By booting outside Windows, isolating individual modules, and distinguishing physical DRAM defects from unstable XMP/EXPO overclocks, you can eliminate memory corruption and restore reliable high-FPS performance to your gaming rig.
Leave a Reply