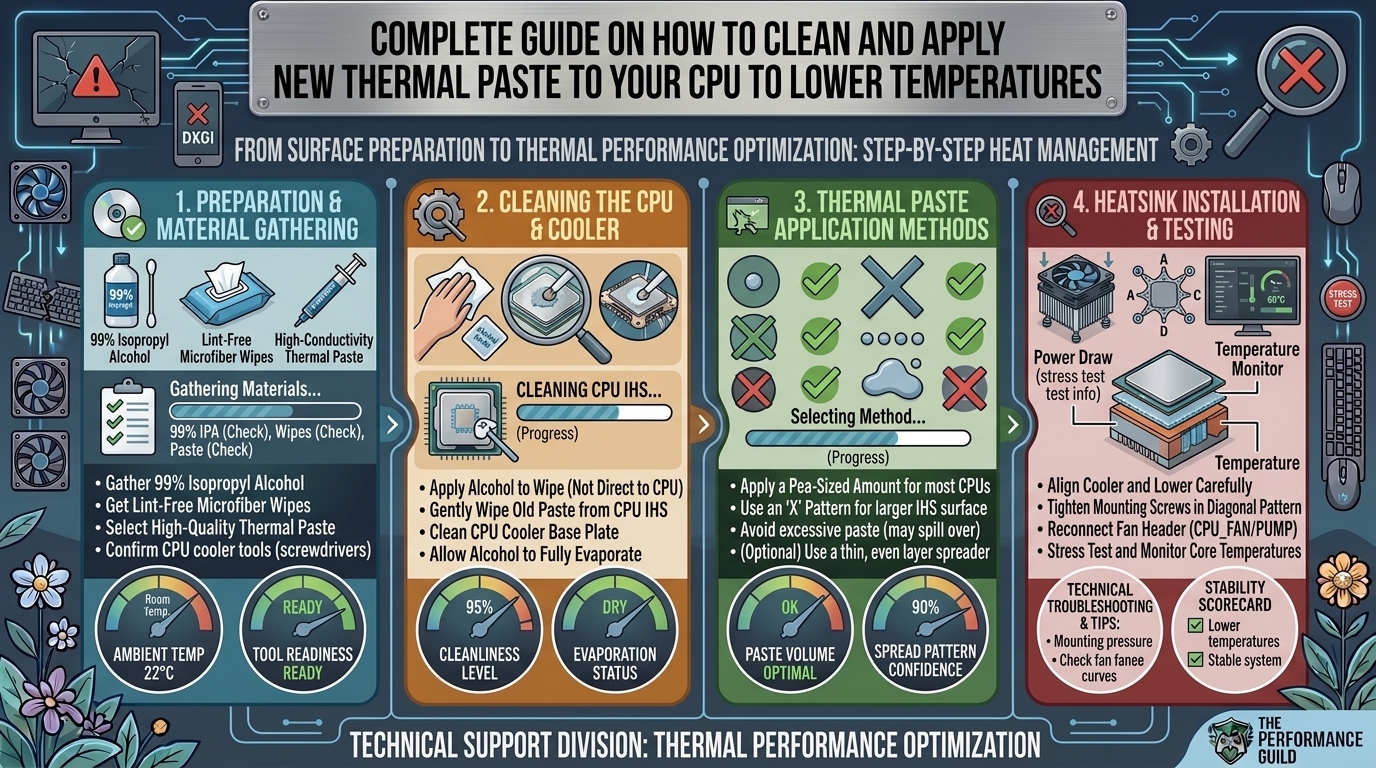
Complete Guide on How to Clean and Apply New Thermal Paste to Your CPU to Lower Temperatures
Maintaining optimal processor temperatures is essential for squeezing every drop of performance out of your gaming rig, maintaining boost clocks, and extending hardware lifespan. Over time, original factory thermal interface material (TIM) degrades, dries out, and loses its heat-transfer efficiency. Reapplying high-quality thermal paste is one of the most effective, low-cost maintenance steps you can perform on your PC.
Understanding Thermal Paste and Heat Transfer
A CPU surface and the copper base of a cooler look perfectly flat to the naked eye, but at a microscopic level, both metals are covered in tiny pits, grooves, and imperfections. Air is an extremely poor thermal conductor. When a cooler is clamped directly onto a CPU without an interface, trapped microscopic air pockets act as heat insulators, forcing CPU core temperatures to spike immediately under load.
Thermal paste (also called thermal interface material, thermal compound, or CPU grease) is designed to fill those microscopic air gaps with a highly thermally conductive medium.
[ CPU Cooler Base Plate ]
=========================
  ~ ~ Thermal Paste ~ ~   <-- Fills microscopic air pockets
=========================
[ CPU Integrated Heat Spreader (IHS) ]
Types of Thermal Interface Materials
| Material Type | Electrical Conductivity | Thermal Performance | Risk Level | Ideal Use Case |
| Non-Conductive Carbon/Silicone | Non-conductive | High | Low | Everyday gaming, general maintenance |
| Metal-Oxide (Ceramic) | Non-conductive | Moderate | Low | Budget builds, standard desktop CPUs |
| Liquid Metal (Gallium Alloy) | Electrically Conductive | Extreme | High | Delidded CPUs, custom loop liquid cooling |
| Phase-Change Materials (PCM) | Non-conductive | High | Low | High-pressure air coolers, laptops |
Signs Your CPU Needs Fresh Thermal Paste
Knowing when to service your cooling system prevents thermal throttling and structural wear on your motherboard from prolonged high heat.
- Sustained High Idle Temps: CPU idle temperatures remain above 45°C–50°C despite no background applications running.
- Immediate Thermal Throttling: CPU cores hit 95°C–100°C within seconds of initiating a heavy workload or launching a modern AAA title.
- Loud, Maxed-Out Fans: CPU cooler or AIO pump fans ramp up to 100% speed during basic tasks like web browsing.
- Age of Current Paste: The system has been running on the same thermal paste for 2 to 3 years or longer.
- Cooler Displacement: The CPU cooler was bumped, unseated, or rotated during a transport or component upgrade.
Required Tools and Preparation Checklist
Before opening your PC case, assemble these essential tools on a clean, anti-static work area:
- High-Purity Isopropyl Alcohol (99% recommended, 90% minimum): Avoid lower concentrations or standard rubbing alcohol, as they contain water and additives that leave conductive residues or corrode pins.
- Microfiber Cloths or Coffee Filters: Coffee filters are ideal because they are cheap, soft, and guaranteed to be lint-free. Avoid standard paper towels or tissues, which leave microscopic paper fibers on the heat spreader.
- Plastic Spudger or Thermal Paste Spatula: Useful for spreading thermal paste evenly without scratching the heat spreader. Never use metal blades or screwdrivers.
- New Thermal Paste Compound: High-performance, non-conductive options like Noctua NT-H1/NT-H2, ARCTIC MX-4/MX-6, or Thermal Grizzly Kryonaut.
- Screwdriver Set: Properly fitting Phillips (#1 and #2) screwdrivers for CPU cooler mounting brackets.
- Anti-Static Protection: An anti-static wrist strap, or habitually touch the painted metal surface of an grounded PC chassis before handling internal parts.
Step-by-Step Guide: Cleaning and Reapplying Thermal Paste
1.System Power-Down and Thermal Pre-Conditioning:Warm up old thermal paste to make cooler removal effortless.
- Turn on your PC and run a light workload or benchmark for 3–5 minutes to warm up the CPU. This softens dried thermal paste that can act like glue.
- Shut down the system completely.
- Flip the Power Supply Unit (PSU) toggle switch to Off (O) and unplug the AC power cable from the wall.
- Hold down the PC power button for 5 seconds to discharge leftover capacitor energy.
- Disconnect fan and RGB headers connected from the CPU cooler to the motherboard.
2.Safe CPU Cooler Removal:Avoid pulling AMD PGA CPUs out of the socket.
- Unfasten the mounting screws or retention clips in a diagonal X-pattern, loosening each screw two turns at a time to keep pressure even across the CPU socket.
- Crucial Step for AMD AM4 (PGA) CPUs: Gently twist the cooler back and forth horizontally before lifting. Never pull straight up, as hardened paste can rip the CPU out of the locked socket and bend the pins.
- Carefully lift the CPU cooler off the processor and place it base-side up on your workbench.
3.Cleaning Old Compound from CPU and Cooler:Achieve a mirror-finish surface free of microscopic debris.
- Fold a lint-free coffee filter or microfiber cloth and moisten it with 99% isopropyl alcohol.
- Gently wipe the CPU Integrated Heat Spreader (IHS) in firm, circular motions from the outer edges inward to prevent paste from smearing onto motherboard components.
- Repeat with a clean section of cloth soaked in alcohol until no discoloration shows on the wipe.
- Repeat the same cleaning process on the contact plate of your CPU cooler or AIO cold plate.
- Allow both metal surfaces to air-dry for 2 to 3 minutes.
4.Applying Fresh Thermal Paste:Select the best application pattern for your CPU layout.
Select the application method suited to your CPU architecture (detailed in the next section) and apply the correct amount of non-conductive compound directly to the center of the CPU IHS.
5.Remounting the Cooler and Restoring Even Pressure:Secure the thermal interface without creating trapped air pockets.
- Align the CPU cooler cold plate directly over the CPU and lower it straight down without tilting or sliding it around.
- Engage all mounting screws by hand for a turn or two to ensure threads catch evenly.
- Using your screwdriver, tighten the screws in an X-pattern (top-left, bottom-right, top-right, bottom-left), giving each screw two full turns at a time until you meet natural mechanical resistance.
- Do not overtighten; stop when the screws reach their built-in stopping points.
- Reconnect the CPU fan/pump cables to their proper motherboard headers (
CPU_FAN,AIO_PUMP).
Modern CPU Paste Application Patterns Explained
Selecting the right application pattern depends on the size and internal chiplet layout of your CPU.
1. The Pea/Dot Method (Standard Desktop CPUs)
Place a single dot of thermal paste, roughly the size of a standard grain of rice or pea (4–5mm in diameter), directly in the absolute center of the CPU heat spreader.
- Best For: Intel LGA 115x, 1200, AMD AM3/AM4 standard builds.
- How it works: Clamping pressure naturally forces the paste outward in a smooth circle, leaving zero air pockets.
2. The Five-Dot / Cross Pattern (Large Heat Spreaders)
Place a small main dot in the center and four smaller pinhead-sized dots near each corner (about 5mm inside the edges), or draw a thin “X” across the IHS.
- Best For: Intel LGA 1700 (elongated shape) and AMD AM5 processors.
- Why it works: Rectangular CPUs and multi-chiplet layouts have hotspots spread out across a larger area. The five-dot method ensures full corner-to-corner coverage under mounting pressure.
3. The Manual Spread Method (Direct Die & Laptops)
Using a clean plastic spatula or spreader, spread a thin, uniform layer of thermal paste across the entire metal surface before mounting the cooler.
- Best For: Bare-die laptop CPUs, delidded desktop processors, liquid metal applications, and high-viscosity pastes.
- Why it works: Bare silicon dies have no integrated heat spreader to distribute mounting pressure evenly, making manual coverage essential before mounting.
Verifying Temps Post-Application
Once your PC is reassembled and booted into Windows, verify that your new thermal application is performing as expected.
- Idle Temperature Check: Launch a monitoring utility like HWiNFO64, Core Temp, or NZXT CAM. Allow the system to idle for 5 minutes. Healthy idle temperatures generally range between 30°C and 40°C (depending on ambient room temperature and cooler type).
- Stress Test Verification: Run a CPU workload like Cinebench R23, Prime95, or a demanding modern game for 10–15 minutes.
- Analyze Load Temps:
- Air Coolers / Standard AIOs: Target temperatures under load should sit between 65°C and 85°C.
- Modern High-Boost Chips (e.g., Ryzen 7000/9000, Intel 13th/14th Gen): These processors are designed to boost until hitting their thermal targets (up to 89°C–95°C). Verify that your CPU is achieving higher clock speeds and benchmark scores than before, which confirms effective heat dissipation.
Frequently Asked Questions (FAQ)
Q1: How often should I replace my CPU thermal paste?
For high-performance gaming desktops and workstations, reapplying thermal paste every 2 to 3 years maintains peak efficiency. High-quality pastes like Noctua NT-H2 or ARCTIC MX-6 can last up to 5 years, but heavy daily use or high thermal cycles will dry out compound faster.
Q2: What happens if I use too much or too little thermal paste?
Using too little paste leaves dry gaps between the CPU and cooler, causing immediate core hotspots and thermal throttling. Using slightly too much non-conductive paste is usually harmless—excess paste simply squeezes out the sides onto the mounting substrate. However, a massive overflow can make a mess and insulate nearby electrical components.
Q3: Can I use 70% Rubbing Alcohol to clean off old paste?
It is not recommended. 70% isopropyl alcohol contains 30% water and impurities that take longer to evaporate, risking liquid pooling around CPU socket pins. Always use 90% or higher (preferably 99%) purity isopropyl alcohol.
Q4: Do I need to clean and reapply paste if I just installed the cooler brand new?
If your new cooler comes with factory pre-applied thermal paste on the cold plate, you do not need to apply additional paste. However, if you remove or reposition the cooler at any point during installation, you must clean off the pre-applied paste and apply fresh compound to prevent trapped air bubbles.
Q5: Is liquid metal better than standard thermal paste?
Liquid metal offers superior thermal conductivity compared to standard paste, lowering temperatures by an additional 5°C to 15°C. However, liquid metal is electrically conductive and will short-circuit your components if it leaks onto the motherboard. It also reacts chemically with copper and dissolves aluminum coolers. It should only be used by experienced builders on delidded CPUs or specialized nickel-plated cold plates.
Q6: Why did my CPU temperatures go UP after applying new thermal paste?
Higher temperatures after reapplication usually stem from three common issues:
- Uneven mounting screw pressure causing the cooler base to tilt away from the CPU.
- Forgetting to peel off the clear plastic protective film from the bottom of a new cooler cold plate.
- Trapped air pockets caused by lifting and dropping the cooler repeatedly during installation.
Q7: Can I use alternative household materials like grease, petroleum jelly, or toothpaste as thermal paste?
Never. Household items contain water, organic matter, and volatile oils that boil off or break down within minutes under CPU heat. They can corrode metal surfaces, conduct electricity, or cause permanent CPU hardware failure.
Q8: What is the difference between thermal paste and thermal pads?
Thermal paste is a viscous fluid designed to fill microscopic gaps between smooth, high-pressure metal surfaces like CPUs and CPU coolers. Thermal pads are soft, thick, pre-formed sheets used to bridge larger, uneven gaps (1mm to 3mm) over GPU VRAM, power MOSFETs, and M.2 NVMe SSDs. They are not interchangeable on standard desktop CPUs.
Q9: Do I need to remove the CPU from the motherboard socket when cleaning off old thermal paste?
No. It is safer to leave the CPU locked in its motherboard socket while cleaning the Integrated Heat Spreader (IHS). Leaving the CPU socket locked protects delicate socket pins (on LGA motherboards) and CPU pins (on PGA processors) from accidental damage or liquid spills.
Q10: Should I spread the thermal paste manually or let the cooler press it down naturally?
For standard desktop CPUs with an Integrated Heat Spreader (IHS), letting the cooler’s mounting pressure flatten a central dot or five-dot pattern naturally produces a bubble-free layer. Manual spreading is generally reserved for direct-die applications (laptops/delidded chips) or very high-viscosity compounds.
Conclusion
Cleaning and reapplying CPU thermal paste is one of the most effective ways to lower your PC’s operating temperatures, prevent thermal throttling, and keep fan noise down. By choosing a quality non-conductive compound, thoroughly cleaning the contact surfaces with 99% isopropyl alcohol, and securing your CPU cooler with even diagonal torque, you guarantee maximum heat transfer between your processor and cooling system. Make thermal paste maintenance a part of your regular system care routine every couple of years to keep your PC running fast and quiet.
Leave a Reply