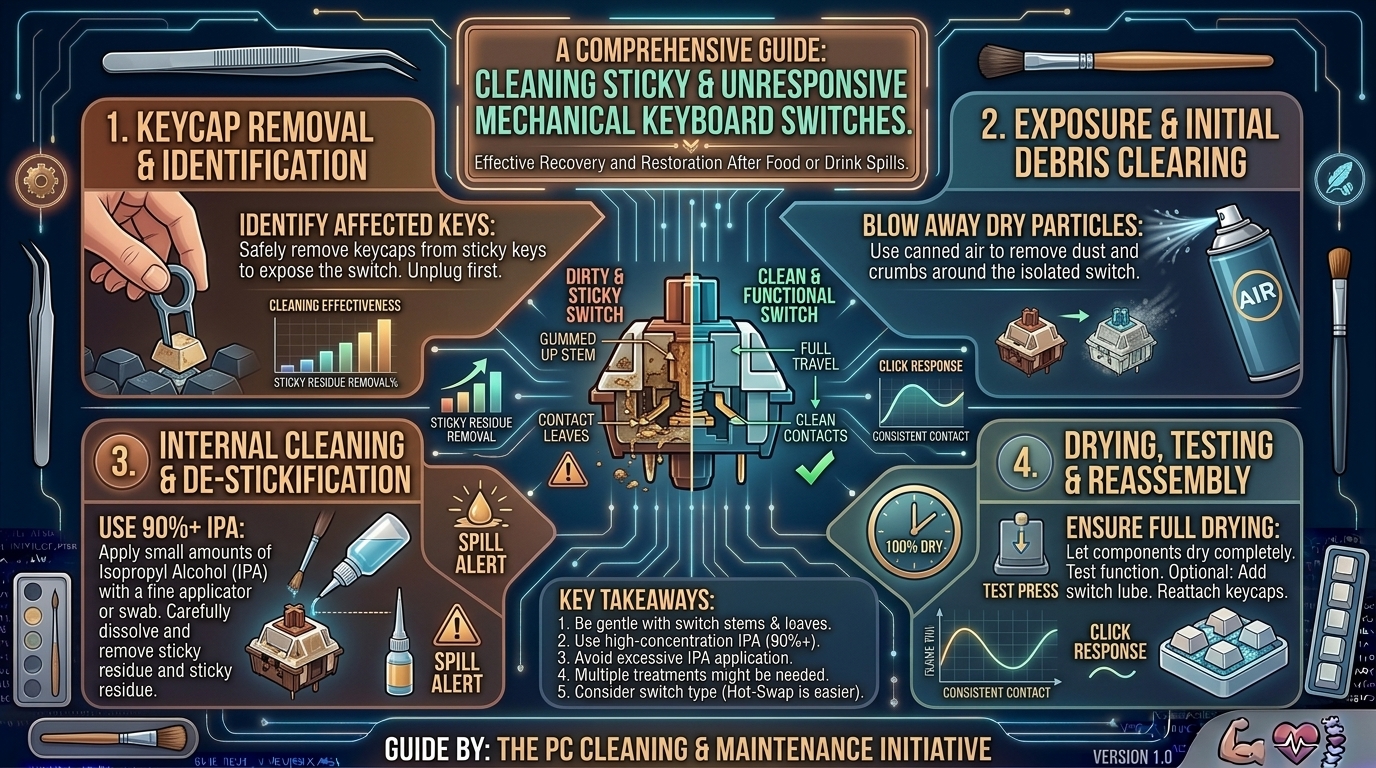
How to Clean Mechanical Keyboard Switches When Keys Become Sticky or Unresponsive from Food or Drink Spills
Accidentally knocking over a cup of coffee, spilling a sugary soda, or dropping snack crumbs directly onto your mechanical keyboard is a nightmare scenario for gamers, writers, and hardware enthusiasts. A single spill can turn your smooth linear, tactile, or clicky key switches into sticky, unresponsive, or double-typing messes.
When liquids—especially those containing sugar, milk, or alcohol—seep past the keycaps and enter the mechanical switch housing, they dry into a tacky residue. This residue prevents the internal spring from bouncing back, coats the gold-plated metal leaf contacts, and disrupts the electrical circuit necessary to register keypresses.
Whether you are dealing with a minor soda splash, a coffee disaster, or years of accumulated food grease, this master guide walks you through emergency spill management, deep cleaning techniques, switch contact restoration, and preventative maintenance for your mechanical keyboard.
1. Immediate Emergency Triage: The First 60 Seconds After a Spill
What you do in the first minute after a liquid spill determines whether your mechanical keyboard survives or ends up in the electronics recycling bin.
+-------------------------------------------------------------------------+
|                    EMERGENCY SPILL ACTION PIPELINE                      |
+-------------------------------------------------------------------------+
| 1. INSTANTLY UNPLUG THE KEYBOARD (Cut Electrical Power)                 |
|      │                                                                  |
|      ▼                                                                  |
| 2. FLIP KEYBOARD UPSIDE DOWN (Prevent Liquid Reaching PCB Logic)       |
|      │                                                                  |
|      ▼                                                                  |
| 3. REMOVE KEYCAPS AROUND SPILL ZONE (Expose Switch Housings)            |
|      │                                                                  |
|      ▼                                                                  |
| 4. BLOT & DRAIN RESIDUAL FLUID (Do NOT Use a Hot Hairdryer)            |
+-------------------------------------------------------------------------+
Step 1: Cut Power Instantly
Do not finish your gaming match or attempt to save your document. Immediately disconnect the USB cable from your PC or turn off the wireless/Bluetooth battery switch. Leaving electrical current flowing through a wet circuit board triggers short circuits, rapid galvanic corrosion, and permanent micro-controller failure.
Step 2: Flip the Keyboard Upside Down
Gravity is your best friend during a spill. Flip the keyboard upside down immediately onto a clean microfiber towel. This stops the liquid from pooling at the bottom of the case and reaching the Printed Circuit Board (PCB).
Step 3: Remove Keycaps in the Affected Area
Use a wire keycap puller to pop off all keycaps around the spill zone. Removing keycaps prevents liquid trapped under the stem from wicking deeper into the switch housing.
Step 4: Blot Excess Liquid (Avoid Heat!)
Carefully dab up liquid using lint-free microfiber cloths or paper towels. Never use a high-heat hairdryer. Excessive heat will warp the ABS or PBT plastic keycaps, melt the stem housings, and damage switch leaves.
4. Cleaning Methods Based on Spill Type and Switch Design
Not all spills require desoldering or taking apart your entire setup. Select the cleaning method that matches your keyboard design and the severity of the spill.
+-------------------------------------------------------------------------+
|                  CLEANING METHOD SELECTION MATRIX                       |
+-------------------------------------------------------------------------+
| Minor Surface Stickiness (Keycap/Stem only) ──► Straw / Isopropyl Method |
| Sugary / Dried Liquid (Hot-Swap PCB)        ──► Switch Pull & Bath      |
| Deep Corrosion / Unresponsive Contact Points──► Contact Cleaner Spray   |
| Severe Spill (Soldered PCB)                 ──► Full Demount & Wash     |
+-------------------------------------------------------------------------+
Method A: The Straw & 99% Isopropyl Alcohol Method (Minor Stickiness)
Best for target key switches on non-hot-swappable boards without opening the casing.
- Ensure the keyboard is completely unplugged.
- Fill a small container with 99% Isopropyl Alcohol (IPA). Note: Avoid 70% rubbing alcohol because its 30% water content takes longer to evaporate and can oxidize metal contacts.
- Dip a standard drinking straw or precision dropper into the alcohol, cap the top with your finger, and place 2 to 3 drops directly onto the depressed switch stem.
- Rapidly press the switch stem up and down 30–50 times. This works the alcohol inside the housing, dissolving dried sugar and coffee residue.
- Blot the excess liquid with a lint-free cloth and let the board dry completely for at least 12 hours before reconnecting power.
Method B: The Switch Pull & Ultrasonic/Warm Bath (Hot-Swappable Boards)
If your mechanical keyboard features a hot-swappable PCB, cleaning sticky keys is straightforward.
+-------------------------------------------------------------------------+
|                     HOT-SWAP SWITCH CLEANING STEPS                      |
+-------------------------------------------------------------------------+
| 1. Pull Switch with Switch Puller ──► 2. Disassemble Switch Housing     |
|      │                                     │                            |
|      ▼                                     ▼                            |
| 3. Soak Plastic Parts in Warm Water ──► 4. Clean Metal Leaf with 99% IPA|
|      │                                     │                            |
|      ▼                                     ▼                            |
| 5. Dry Fully for 24 Hours           ──► 6. Re-lube & Re-install         |
+-------------------------------------------------------------------------+
- Use a metal switch puller to grasp the top and bottom tabs of the sticky switch and pull straight up.
- Open the switch using a 2-prong or 4-prong switch opener to separate the top housing, bottom housing, stem, and spring.
- Soak the plastic housings, stems, and keycaps in a bowl of warm water mixed with a drop of mild dish soap for 30 minutes.
- Rinse thoroughly with distilled water to remove soap film.
- Clean the metal leaf inside the bottom housing using a Q-tip soaked in 99% Isopropyl Alcohol.
- Allow all components to dry for 24 hours. Re-lubricate the stem rails with Krytox 205g0 before snapping the switches back together.
Method C: Electronic Contact Cleaner Spray (For Unresponsive / Chatter Keys)
When a switch moves smoothly but fails to register inputs (or registers single presses twice—known as key chatter), dried residue has likely coated the internal gold contact leaves.
- Unplug the keyboard.
- Purchase a dedicated, quick-drying Electronic Contact Cleaner (such as WD-40 Specialist Electrical Contact Cleaner or DeoxIT). Ensure it is designated plastic-safe.
- Attach the thin straw attachment to the nozzle.
- Depress the switch stem fully and spray a short 1-second burst directly into the internal stem opening.
- Actuate the key 40 times to allow the solvent to break down corrosion, carbon deposits, and dried oils on the metal leaf.
- Wait 15–20 minutes for the solvent to evaporate completely before plugging the keyboard back in.
3. Recommended Tools for Mechanical Keyboard Cleaning
| Tool / Supply | Primary Purpose | Safety Rating |
| 99% Isopropyl Alcohol (IPA) | Dissolves sugars, greases, and evaporates without leaving residue | Safe for PCB & Switch Plastics |
| Electronic Contact Cleaner | Cleans internal metal contact leaves and fixes key chatter | Plastic-Safe Required |
| Wire Keycap Puller | Removes keycaps without scratching plastic edges | Highly Recommended |
| Switch Opener Tool | Disassembles switch housings on hot-swap boards | Safe |
| Distilled Water | Rinses soapy residue without mineral deposits | Safe for Non-Powered Components |
| Krytox 205g0 Lubricant | Re-lubricates stems after cleaning out original grease | Safe |
4. Step-by-Step Reassembly and Testing Protocol
Once your switches and keycaps are thoroughly cleaned and completely dry, follow this process to safely test your hardware:
- Perform a Visual Moisture Inspection: Inspect the inside of the switch housings using a flashlight. If any moisture drops remain, allow another 12 hours of drying time.
- Re-seat Switches & Keycaps: Align the metal pins on hot-swap switches carefully before pressing them into the PCB socket to avoid bending pins.
- Connect to Power: Plug the USB cable back into your PC.
- Run a Keyboard Testing Utility: Open an online testing tool (such as Keyboard Tester or VIA / QMK Configurator key tester mode).
- Verify Input Registration: Press every cleaned key repeatedly. Check for smooth mechanical travel, consistent actuation depth, and verify that key chatter (double-registering) has been resolved.
5. Frequently Asked Questions (FAQ)
1. Can I wash my entire mechanical keyboard in the dishwasher or sink?
No. Washing a full keyboard in a dishwasher introduces minerals, rusts internal steel plate mounts, destroys RGB LEDs, and traps moisture beneath soldered components. Always spot-clean switches or disassemble the board to wash plastic components separately.
2. Is 70% rubbing alcohol safe for cleaning sticky key switches?
70% Isopropyl Alcohol contains 30% water. While it can be used in an emergency, it takes much longer to evaporate and can cause rust on internal steel springs and metal leaf contacts. Always opt for 99% Isopropyl Alcohol for electronic components.
3. Why does my key feel sticky even after I cleaned the switch?
Stickiness can also occur along the stabilizers on larger keys (Spacebar, Shift, Enter, Backspace). Sugar residue often settles inside the stabilizer housing sliders or along the metal wire. Remove the keycap and clean the stabilizer sliders using isopropyl alcohol and a cotton swab.
4. What is “key chatter” and how does cleaning fix it?
Key chatter occurs when a single keypress registers multiple times (e.g., pressing “t” types “tt”). Spills leave dried film between the gold contact leaves inside the switch, causing uneven electrical contact. Cleaning the contacts with electronic contact cleaner dissolves this barrier and restores clean signal reads.
5. Will using Isopropyl Alcohol wash away my switch lubricant?
Yes. High-purity alcohol dissolves custom lubricants (like Krytox or Tribosys) along with factory grease. If you clean a switch with alcohol, consider re-lubricating the stem rails and spring to restore a smooth keypress feel.
6. How long should I wait for a keyboard to dry after a major spill?
Allow a minimum of 24 to 48 hours in a well-ventilated area. Placing the disassembled keyboard near a fan speeds up drying time. Do not use heat sources like ovens or hot hairdryers.
7. What should I do if a switch pin bends when putting a hot-swap board back together?
Unplug the keyboard, pull the switch back out using a switch puller, and inspect the thin copper pins on the bottom. Use fine tweezers or small needle-nose pliers to gently straighten the pin, then reinsert it straight into the socket.
8. Can optical switches (like Razer Clicky/Linear Optical) get sticky from spills?
Yes. Although optical switches use light beams rather than metal leaves to register keypresses, the mechanical stem and return spring can still get coated in sticky residue, causing the key to stick down physically. Clean optical switches using the same alcohol drop method.
9. How do I remove stubborn grease and shine from PBT/ABS keycaps?
Soak keycaps in warm water with mild dish soap for 30 minutes, scrub them gently with a soft toothbrush, rinse with clean water, and air-dry completely. Avoid harsh solvents like acetone, which will melt ABS plastic keycaps instantly.
10. Does a liquid spill void my mechanical keyboard’s warranty?
Yes. Almost all hardware manufacturers treat liquid damage as user neglect, which voids standard warranties. Following proper cleaning techniques can help you restore the keyboard yourself without needing a costly replacement.
Dealing with a sticky or unresponsive mechanical keyboard requires patience and the right cleaning methods. By instantly cutting power, using high-purity 99% Isopropyl Alcohol or contact cleaners, and allowing components to dry fully, you can revive your key switches, clear out spill residue, and return to smooth, reliable gaming and typing performance.
Leave a Reply