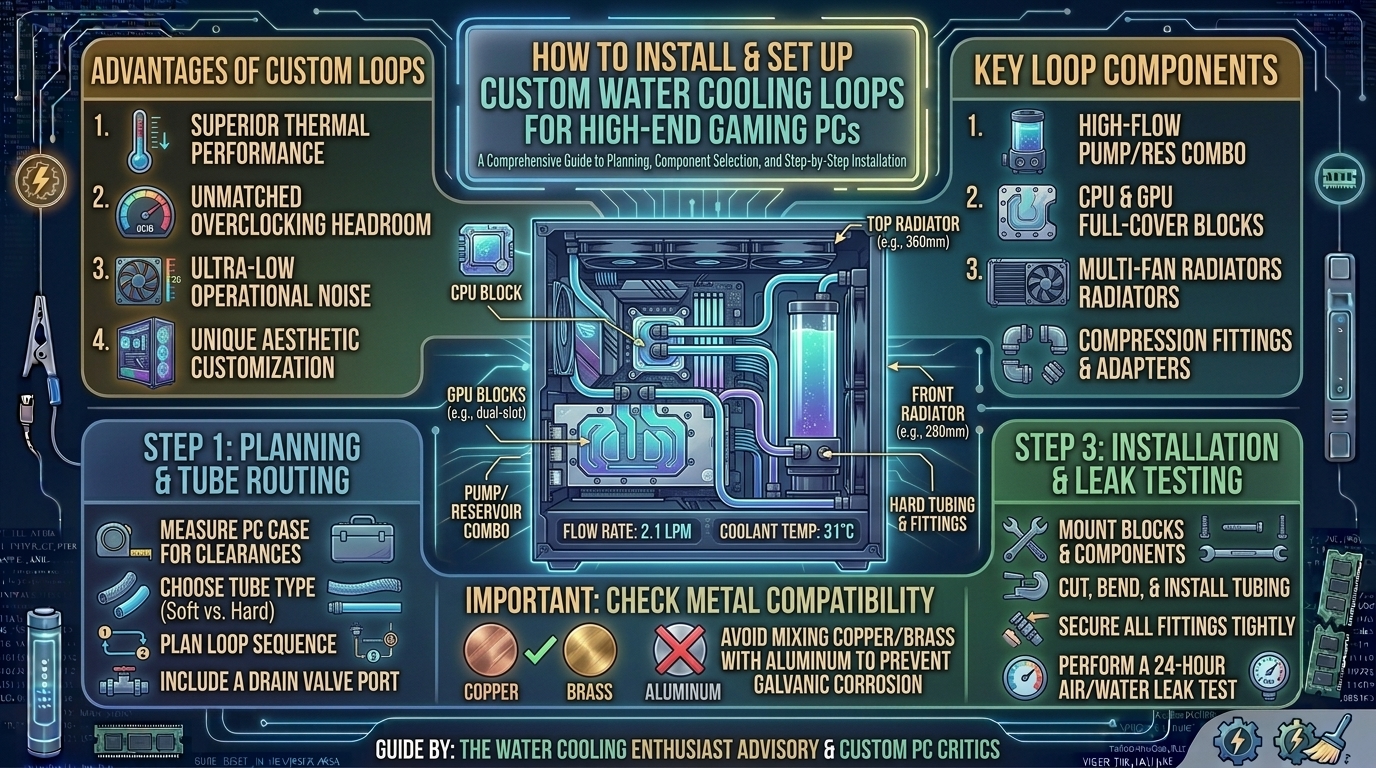
How to Install and Set Up Custom Water Cooling Loops for High-End Gaming PC Builds
Custom liquid cooling—often referred to as open-loop cooling—is the pinnacle of PC thermal engineering. Unlike off-the-shelf All-In-One (AIO) liquid coolers or traditional air towers, a custom loop delivers maximum heat dissipation, ultra-quiet operation, and unparalleled aesthetic customization. By circulating liquid coolant through dedicated water blocks, pumps, radiators, and tubing, high-end gaming rigs can maintain peak CPU and GPU boost frequencies under continuous heavy workloads without thermal throttling.
However, designing and assembling a custom loop requires meticulous planning, precise measuring, and rigorous leak testing. This step-by-step guide covers everything you need to know: selecting components, planning loop order, bending tubing, flushing lines, and maintaining your system long-term.
Custom Loop Planning Matrix: Component Selection
| Loop Component | Primary Function | Selection Metric | Key Recommendation |
| CPU Water Block | Transfers heat from CPU Integrated Heat Spreader (IHS) to coolant. | Socket compatibility (LGA1700, AM5) and cold plate material. | Nickel-plated copper with micro-fin internal array. |
| GPU Water Block | Full-cover cooling for GPU core, VRAM, and VRM power stages. | Exact PCB layout compatibility (Reference vs. Custom AIB). | Full-cover block with aluminum-isolated active backplate. |
| Radiator | Dissipates heat from liquid into passing airflow via fans. | Surface area rule: 120mm per component + 120mm headroom. | High-density copper radiator (30mm–60mm thickness). |
| Pump / Reservoir Combo | Drives coolant flow through the loop and eliminates air pockets. | Flow rate pressure head (D5 vs. DDC pump design). | D5 Pump for high flow & low noise; DDC for tight spaces. |
| Tubing & Fittings | Routes fluid between components cleanly without leaking. | Hard Tubing (PETG/Acrylic/Metal) vs. Soft Tubing (EDPM/PVC). | PMMA Acrylic for clarity and heat resistance; Compression Fittings. |
1. Loop Order & Radiator Capacity Math
A common misconception among first-time builders is that loop order dictates liquid temperature. Because coolant flows through the loop at high velocity (typically 1 to 2 gallons per minute), liquid temperature equalizes across the entire system within 1 to 2 degrees Celsius.
COOLANT FLOW DYNAMICS:
[ Reservoir / Pump ] ---> [ Component (CPU/GPU) ] ---> [ Radiator ] ---> [ Return to Reservoir ]
The Golden Rules of Loop Design:
- Reservoir Directly Before Pump: The pump must never run dry. Gravity must feed coolant into the pump inlet at all times to prevent bearing destruction within seconds.
- Radiator Sizing Rule: Calculate 120mm of radiator surface area for every 100W of heat load, plus an extra 120mm for thermal headroom and quiet fan profiles.
- Example: Intel i9-14900K (250W) + NVIDIA RTX 4090 (450W) = 700W total load.
- Required Radiators: Minimum 720mm total radiator area (e.g., two 360mm radiators or one 480mm + 240mm setup).
2. Step-by-Step Installation & Assembly Workflow
1.Mount CPU & GPU Water Blocks:Prepare components before installing fittings.
Clean the CPU heat spreader with 99% isopropyl alcohol, apply non-conductive thermal paste, and secure the CPU block using balanced cross-pattern mounting pressure. For the GPU, dismantle the stock air cooler, place high-thermal-conductivity pads on VRAM/VRMs, apply thermal paste to the bare GPU die, and fasten the full-cover water block.
2.Install Radiators and Fans:Match fan static pressure to radiator density.
Position radiators inside your chassis (Top/Front/Side) ensuring fans are set in a balanced push or pull orientation. Use high static-pressure fans optimized to force air through dense radiator fin arrays.
3.Mount the Pump / Reservoir Combo:Secure the heart of your loop.
Attach the pump-reservoir unit securely to dedicated mounting brackets on your chassis or lower radiator fans. Ensure the bottom outlet ports align logically with your GPU and CPU tubing runs.
4.Measure, Bend, and Seat Tubing Runs:Measure twice, cut once.
If using PMMA acrylic or PETG hard tubing, heat the bend area evenly using a heat gun at 300°C to 350°C with a silicone insert inside to prevent collapse. Chamfer inner and outer edges of cut tube ends to avoid tearing compression fitting O-rings.
5.Air Pressure Test & Fluid Filling:24-hour dry pressure check before adding fluid.
Attach an air-pressure leak tester to the loop and pump up to 0.5 bar (7.2 PSI). If pressure holds steady for 15 minutes, fill the reservoir with clear premixed coolant using a 24-pin ATX bridge plug to power only the pump (keeping the motherboard, CPU, and GPU completely powered off).
3. Critical Safety: Air Pressure Testing vs. Wet Leak Testing
Never fill a newly built custom loop with liquid without performing a preliminary air pressure test.
+-------------------------------------------------------------------------------+
|                       LEAK-TESTING PROTOCOL CHECKLIST                         |
+-------------------------------------------------------------------------------+
| [ ] Disconnect main 24-pin motherboard power cable                             |
| [ ] Connect 24-pin PSU Jumper Cap (Powers ONLY the liquid pump)               |
| [ ] Place paper towels beneath every fitting, block terminal, and radiator joint|
| [ ] Pump air into loop to 0.5 Bar (Check for needle drops over 15 mins)        |
| [ ] Fill reservoir to 80% with clear pre-mixed biocide coolant                |
| [ ] Power pump on/off rapidly to bleed air pockets while topping off fluid    |
| [ ] Run loop continuously for 12-24 hours before powering system electronics  |
+-------------------------------------------------------------------------------+
4. Essential Maintenance Tips for Custom Loops
- Use Premixed Clear Coolants: Avoid opaque “pastel” or heavy dye fluids in daily-driven rigs. Microscopic color particulates inevitably separate over time, clogging the micro-fins of your CPU and GPU cold plates.
- Biocide & Corrosion Inhibitors: If using distilled water, you must add concentrated biocide (to stop algae/bacterial growth) and anti-corrosive additives (to prevent galvanic corrosion between copper and nickel components). Never mix aluminum components with copper or brass!
- Annual Drain and Flush: Drain your loop every 12 months using a dedicated bottom drain valve, flush the system with distilled water, and refill with fresh coolant.
Frequently Asked Questions (FAQ)
Q1: How much does a custom water cooling loop cost?
A: A complete high-end CPU + GPU custom loop typically costs between $600 and $1,200+, depending on component brands, radiator sizes, and hard vs. soft tubing choices.
Q2: What is galvanic corrosion, and how do I prevent it?
A: Galvanic corrosion occurs when dissimilar metals (like aluminum and copper) share the same liquid loop, causing the aluminum to rapidly corrode and disintegrate. Always ensure every liquid-touching component in your loop is made of copper, brass, or nickel-plated copper.
Q3: What is the difference between D5 and DDC pumps?
A: D5 pumps are larger, liquid-cooled, offer high flow rates, and run extremely quietly. DDC pumps are smaller, air-cooled, generate higher pressure head (great for tight spaces or complex multi-radiator loops), but run slightly warmer and louder.
Q4: Should I use PETG or Acrylic (PMMA) tubing for a hardline build?
A: Acrylic (PMMA) is superior. While PETG is easier to cut and bend, it has a low deformation temperature (~60°C). If coolant temperatures spike during fan failure, PETG tubing can soften at the compression fittings and cause catastrophic leaks.
Q5: Can I run plain tap water in a custom loop?
A: No. Tap water contains minerals that cause scaling, deposits, and rapid bacterial growth. Use only distilled water with biocide/inhibitor additives or premixed specialty gaming PC coolants.
Q6: What is a drain valve, and where should it be installed?
A: A drain valve is a ball-valve fitting installed at the lowest physical point of your loop (usually off a T-splitter fitting at the pump/reservoir base). It allows you to drain fluid cleanly during routine maintenance.
Q7: How do I get trapped air bubbles out of my loop?
A: Gently tilt the PC chassis side to side while the pump is running at 100% speed. Air bubbles trapped in radiators will travel back into the reservoir where they can bleed off into the top air chamber.
Q8: How often do custom liquid loops leak?
A: When assembled properly using quality compression fittings, intact O-rings, and verified with an air-pressure tester prior to filling, custom loops are exceptionally reliable and rarely leak.
Q9: What fan setup works best for dual radiators?
A: Set both top and front radiators as Intake (pulling fresh ambient air through the fins) or both as Exhaust. Mixing one intake radiator with one exhaust radiator feeds hot air from the first radiator directly into the second, reducing thermal efficiency.
Q10: Are soft tubes easier for beginners than hard tubing?
A: Yes. High-grade soft tubing (such as EPDM / ZMT rubber) is vastly simpler to cut, requires no heat gun bending, and utilizes locking barbed fittings that make installation fast and virtually leak-proof.
Conclusion
Building a custom water cooling loop is one of the most rewarding hardware projects in PC gaming. Beyond transforming your system into a stunning visual centerpiece, an open loop unlocks maximum overclocking potential, low noise levels, and optimal thermal efficiency for high-end components like the Intel Core i9, AMD Ryzen 9, and NVIDIA RTX 4090 series. Plan your loop layout carefully, leak-test thoroughly, and enjoy peak gaming performance.
Leave a Reply