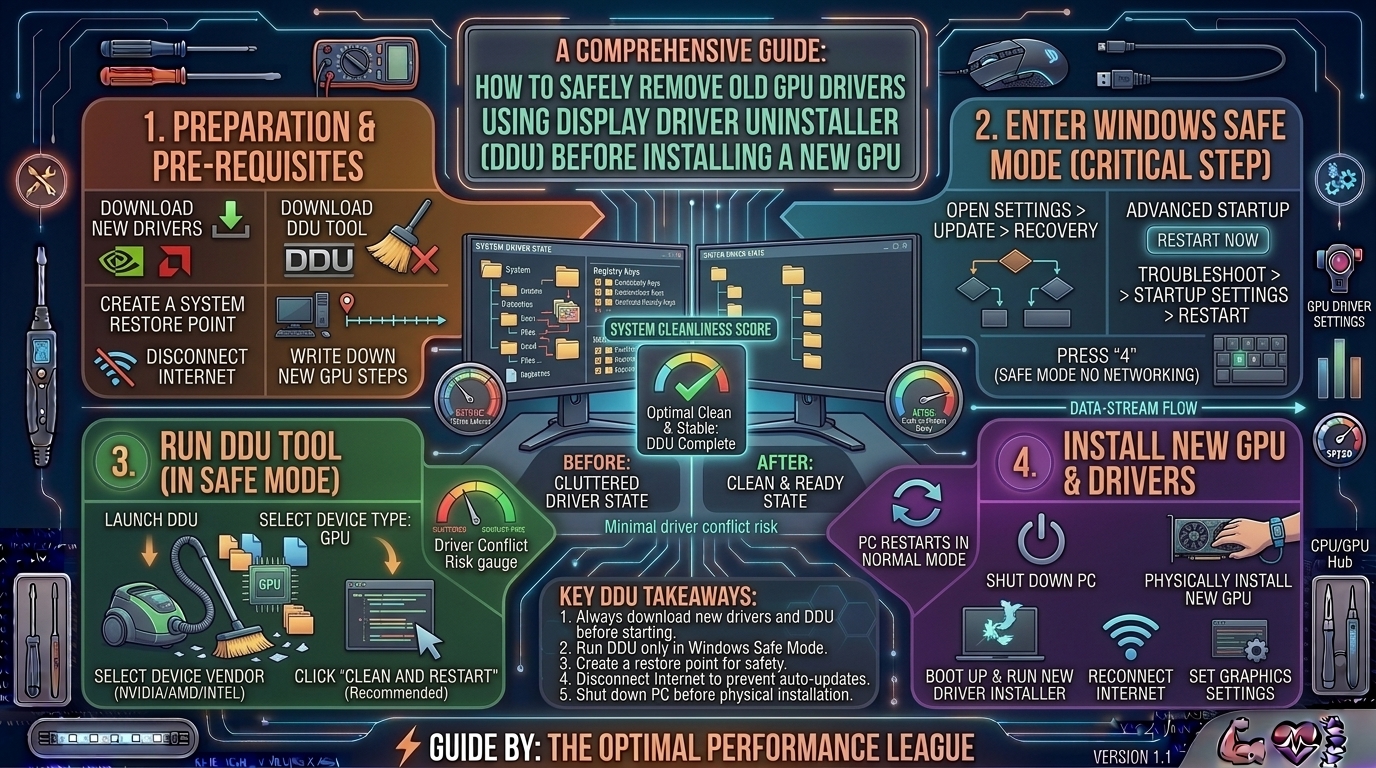
Upgrading your graphics card is one of the most exciting milestones in PC building. Whether you are moving from an older NVIDIA GeForce card to a modern powerhouse, transitioning from AMD Radeon to NVIDIA, or building an entirely new rig layout, slotting in fresh hardware brings a wave of anticipation.
However, many PC builders make a critical mistake: they swap the physical hardware without properly purging the old display drivers. Simply relying on the standard Windows uninstaller or swapping cards blindly leaves behind gigabytes of residual files, conflicting registry keys, and legacy telemetry hooks buried deep within the Windows Driver Store. These leftovers frequently cause black screens, mysterious DirectX crashes, micro-stuttering, and suppressed frame rates.
The industry-standard solution used by technicians and hardware enthusiasts worldwide is Display Driver Uninstaller (DDU), created by Wagnardsoft. This comprehensive guide walks you through why DDU is essential, how to use it safely in Windows Safe Mode, and how to execute a pristine GPU driver installation.
1. Why Standard Uninstallation Isn’t Enough
When you uninstall a graphics driver through the Windows Control Panel or a manufacturer’s basic setup utility, the routine is often incomplete.
+-------------------------------------------------------------------------+
|                STANDARD UNINSTALL VS DDU CLEAN SWEEP                    |
+-------------------------------------------------------------------------+
| Standard Uninstall (Control Panel / Settings)                           |
|   ├─► Removes primary application files                                 |
|   └─► Leaves behind registry keys, driver store caches, and old hooks   |
|                                                                         |
| DDU Deep Clean (Safe Mode Execution)                                    |
|   ├─► Purges core files, INF caches, and orphaned registry entries      |
|   └─► Wipes OEM shader caches and forces Windows to a neutral baseline  |
+-------------------------------------------------------------------------+
- Driver Store Clutter: Windows maintains a local Driver Store repository (
C:\Windows\System32\DriverStore) to cache hardware packages. Old driver iterations linger here indefinitely, sometimes overriding newly installed drivers. - Cross-Brand Conflicts: If you are switching camps—such as moving from an AMD Radeon card to an NVIDIA GeForce card—leftover AMD control software services trying to query hardware that no longer exists can create heavy background CPU overhead and software crashes.
- Corrupted Shader Caches: Game engine shader caches compiled by your old GPU architecture can cause artifacting and stuttering on your new card until completely wiped.
2. Preparation Checklist Before Running DDU
Before launching DDU, complete these crucial preparation steps to ensure a smooth, stress-free transition:
- Download the New Driver in Advance: Because DDU completely strips your network-facing display drivers and can disable automatic Windows Update driver downloads temporarily, download the latest official driver package from NVIDIA, AMD, or Intel beforehand and save it to your desktop. Do not install it yet.
- Disconnect Your Internet Connection: Unplug your Ethernet cable or turn off your Wi-Fi router. This stops Windows Update from automatically downloading and installing generic Microsoft Basic Display Drivers the second your old drivers are wiped.
- Download the Latest DDU Package: Obtain the official version of Display Driver Uninstaller (DDU) from Wagnardsoft and extract the executable file to an easy-to-find folder on your desktop.
3. How to Boot Into Windows Safe Mode
DDU must be run inside Windows Safe Mode for absolute stability and complete file access. In Safe Mode, Windows restricts third-party background applications, antivirus hooks, and active display services from locking files, allowing DDU to purge every single registry entry.
+-------------------------------------------------------------------------+
|                  WINDOWS SAFE MODE ACCESS PIPELINE                      |
+-------------------------------------------------------------------------+
| Open Start Menu ──► Hold SHIFT Key ──► Click "Restart"                  |
|                                                                         |
| Navigate Menus : Troubleshoot ──► Advanced Options ──► Startup Settings |
|                                                                         |
| Final Action   : Click Restart ──► Press '4' or 'F4' for Safe Mode      |
+-------------------------------------------------------------------------+
- Open the Windows Start Menu, click the Power icon, hold down the
Shiftkey on your keyboard, and click Restart. - Your PC will reboot into a blue options menu. Select Troubleshoot.
- Choose Advanced options.
- Click Startup Settings (if you don’t see it, click “See more recovery options” at the bottom).
- Click the Restart button.
- When your computer reboots to a numbered list, press
4orF4on your keyboard to select Enable Safe Mode.
4. Step-by-Step Guide to Running DDU
Once your PC boots into the low-resolution Safe Mode environment, you are ready to clean your system.
+-------------------------------------------------------------------------+
|                     DDU OPERATION WORKFLOW                              |
+-------------------------------------------------------------------------+
| 1. Launch DDU Executable as Administrator                               |
| 2. Select Device Type (GPU) and Device Brand (NVIDIA / AMD / Intel)      |
| 3. Click "Clean and Restart" (Wipes all files and reboots PC normally)  |
+-------------------------------------------------------------------------+
- Open the folder where you extracted DDU and double-click Display Driver Uninstaller.exe.
- Note: A configuration options window will pop up on first launch. You can leave the default settings checked (they are optimized for standard cleanups), then click Close.
- On the right side of the main DDU interface, locate the Select device type drop-down menu and select GPU.
- Right below it, select your target device brand (NVIDIA, AMD, or Intel). Tip: If you used to run an AMD card and are now switching to NVIDIA, run DDU twice: first to clean out the old AMD drivers, and a second time to clean out any residual NVIDIA files just to be certain.
- Click the top-left button: “Clean and restart”.
- DDU will execute a deep system purge, stripping registry keys, driver store packages, and folders. Once complete, your computer will automatically restart into normal Windows mode.
5. Post-DDU: Installing Your New GPU and Drivers
With your system completely cleared of old driver debris, you have achieved a pristine software baseline.
- Install the Physical Hardware: If you are swapping your physical graphics card, power down your PC completely, flip off the PSU switch, unplug the power cord, discharge residual power by pressing the power button for 5 seconds, swap your old GPU for the new one, secure the PCIe retention latch, plug in your power cables (ensuring 8-pin or 12VHPWR connectors are pushed all the way home), and boot back up.
- Reconnect to the Internet: Plug your Ethernet cable back in or reconnect to Wi-Fi.
- Install the Fresh Driver: Double-click the installer package you downloaded in Step 2. Select Custom (Advanced) Installation, check the box for “Perform a clean installation” (if available in the installer menu), and finish the setup.
- Reboot Your PC One Final Time: This ensures all display services, control panels, and startup hooks register correctly with the Windows kernel.
6. Summary Table: Driver Cleaning Comparison
| Method | Thoroughness | Risk Level | Best Used For |
| Windows Control Panel Uninstall | Low (Leaves debris) | Very Low | Basic office PC cleanups |
| Manufacturer Installer “Clean Install” | Moderate | Low | Routine minor driver updates |
| Display Driver Uninstaller (DDU) | Maximum (Complete Wipe) | Low (If used in Safe Mode) | Major GPU upgrades & troubleshooting persistent crashes |
7. Frequently Asked Questions (FAQ)
1. Is Display Driver Uninstaller (DDU) safe to use on Windows 11?
Yes. DDU is fully compatible with Windows 10 and Windows 11. It is developed and continuously updated by trusted community developer Wagnardsoft to support the latest Windows security protocols and driver store structures.
2. Do I need to run DDU if I am updating from one NVIDIA driver to a newer NVIDIA driver?
No. For routine monthly driver updates (e.g., updating to support a new game release), standard installations or checking “Perform a clean installation” inside the GeForce Experience / NVIDIA app is sufficient. DDU is primarily recommended when changing GPU brands (AMD to NVIDIA, etc.), upgrading hardware, or troubleshooting persistent game crashes.
3. Why must DDU be run in Safe Mode?
Safe Mode prevents Windows from loading third-party background services, active display processes, and security software file locks. Running DDU in normal mode risks leaving locked files behind, resulting in an incomplete clean.
4. What should I do if my screen resolution looks stretched or distorted after restarting?
This is completely normal. After DDU wipes your drivers, Windows falls back to the generic Microsoft Basic Display Adapter. Once you install your fresh manufacturer driver package, your native resolution and multi-monitor setups will immediately return to normal.
5. Does DDU delete my personal files, games, or documents?
No. DDU is strictly designed to target display drivers, audio drivers bundled with GPU packages (like NVIDIA High Definition Audio), registry entries, and driver store repositories. It does not touch your personal files, installed games, or documents.
6. Can I use DDU to clean up integrated graphics drivers as well?
Yes. From the device brand selection menu, you can choose between NVIDIA, AMD, and Intel. If your CPU features integrated graphics (iGPU) and you want to wipe those drivers alongside your discrete GPU, you can run cleanups for both.
7. Why is it important to disconnect my internet before running DDU?
Disconnecting your internet prevents Windows Update from automatically downloading and installing default Microsoft graphics drivers in the background while your old drivers are being uninstalled. This guarantees you have full control to install the official manufacturer driver cleanly.
8. What happens if I forget to check the box or select the correct GPU brand in DDU?
If you select the wrong brand, DDU will simply search for files belonging to that manufacturer and find nothing. Re-open DDU, select the correct manufacturer corresponding to your old card, and run the clean process again safely.
9. Does DDU delete custom overclocking profiles or settings?
Yes. Because DDU strips the entire driver installation package, any custom fan curves, undervolts, or core clocks saved inside software like MSI Afterburner or AMD Adrenalin will be reset to default. Make sure to note your preferred settings before running DDU.
10. How often should I use DDU on my gaming PC?
You should only use DDU when necessary—specifically during a graphics card upgrade, when switching hardware vendors, or when troubleshooting stubborn system crashes and driver-related blue screens. Routine use for standard updates is unnecessary.
Using Display Driver Uninstaller (DDU) before installing a new graphics card guarantees a completely clean slate, preventing software conflicts, stuttering, and performance bottlenecks. By taking a few extra minutes to boot into Safe Mode and purge legacy files, you ensure your new GPU operates at its absolute peak performance from the moment you boot into your favorite games.
Leave a Reply