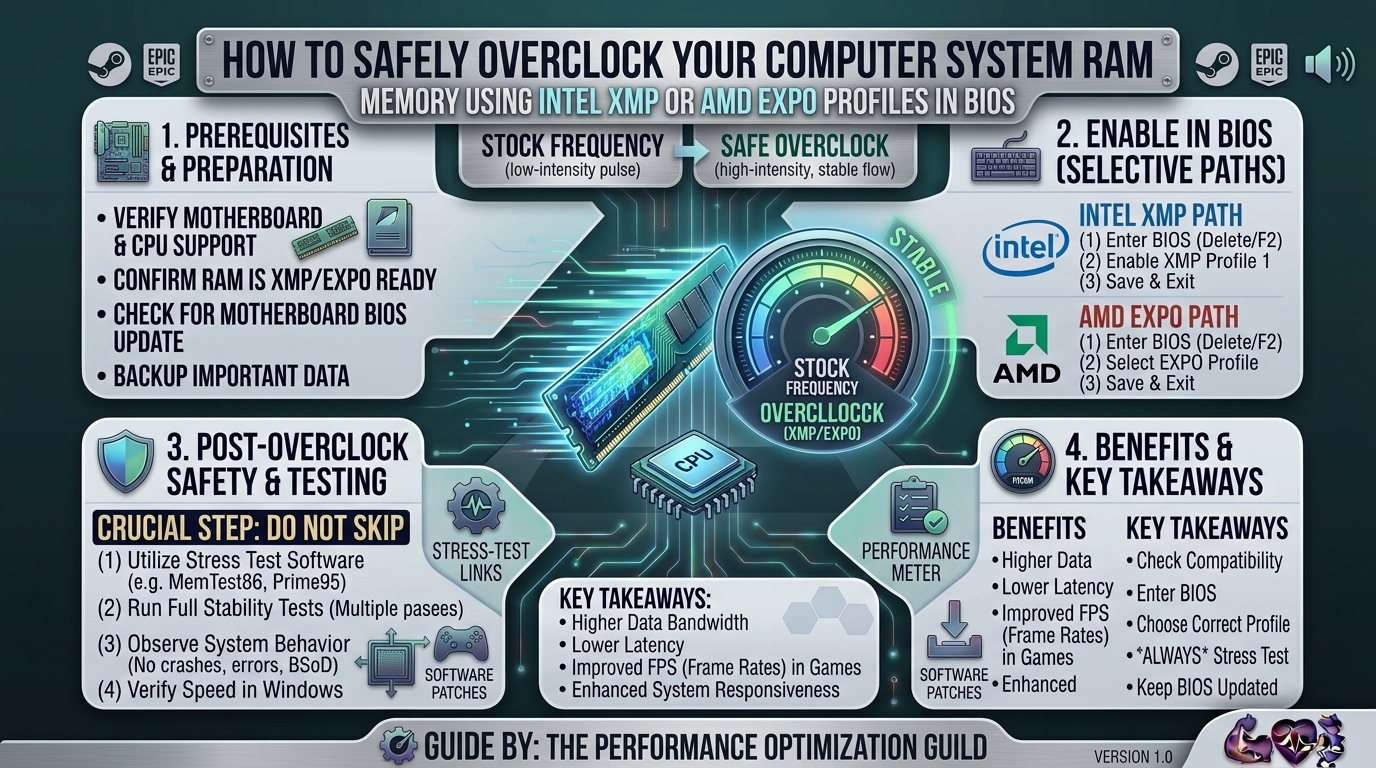
How to Safely Overclock Your Computer System RAM Memory Using Intel XMP or AMD EXPO Profiles in BIOS
Welcome back to The Gamer Buzz—your ultimate authority for hardware optimization, gaming performance guides, and deep-dive technical breakdowns, proudly serving gaming communities from New York and San Francisco to Texas, Washington, and California.
When you invest in high-performance system memory—whether it is ultra-fast DDR4 or cutting-edge DDR5 kits—you are rarely getting its true, advertised speed out of the box. By default, your motherboard boots your RAM at a baseline, conservative JEDEC speed (such as 2133MHz, 2666MHz, or 4800MHz) to guarantee universal compatibility.
Leaving your RAM at default speeds means you are leaving valuable frame rates, smoother 1% lows, and faster data processing speeds on the table. Fortunately, memory manufacturers make unlocking your RAM’s rated speed safe and simple through pre-configured overclocking profiles: Intel XMP (Extreme Memory Profile) and AMD EXPO (Extended Profiles for Overclocking).
This comprehensive, expert-backed guide will walk you through everything you need to know about memory overclocking, how to safely enable XMP or EXPO in your BIOS, and how to verify system stability.
1. Understanding Memory Overclocking: What Are XMP and EXPO?
Before diving into the BIOS, it helps to understand what these profiles actually do to your hardware.
- JEDEC Baseline Specs: When you first install RAM, the motherboard reads standard, low-voltage profiles designed to boot any system safely without user intervention.
- Intel XMP (Extreme Memory Profile): Developed by Intel, XMP stores custom manufacturer-tested profiles (speed, timings, and voltage) directly onto a small chip on your RAM stick (the SPD). Activating XMP tells your motherboard to bypass JEDEC defaults and apply the kit’s rated high-performance specifications. (Note: XMP works seamlessly on Intel platforms and is frequently supported on modern AMD motherboards as well).
- AMD EXPO: Introduced for the AM5 platform with DDR5 memory, EXPO serves the exact same purpose as XMP but is optimized specifically for AMD Ryzen processors, featuring enhanced sub-timing adjustments tailored to AMD’s Infinity Fabric architecture.
2. Pre-Check: Is Your System Ready for Memory Overclocking?
While XMP and EXPO are technically “factory-approved” overclocks, you should verify a few foundational requirements before proceeding:
- Check Motherboard Support: Ensure your motherboard’s QVL (Qualified Vendor List) supports your specific RAM kit model and rated speed.
- Update Your BIOS: Older BIOS versions can have buggy memory training algorithms. Update your motherboard BIOS to the latest stable release for improved RAM compatibility and stability.
- Verify DIMM Slot Placement: For dual-channel memory configurations, ensure your two RAM sticks are installed in the correct slots recommended by your motherboard manual (typically slots A2 and B2, counting away from the CPU). Installing them in adjacent slots (A1 and B1) can cause memory training failure at high speeds.
3. Step-by-Step: How to Enable Intel XMP or AMD EXPO in BIOS
Enabling your memory profile takes just a few minutes. Follow these steps carefully:
Step 1: Enter the BIOS/UEFI Interface
- Shut down your computer completely.
- Turn your PC back on and immediately start tapping the
DeleteorF2key repeatedly (depending on your motherboard brand, such as ASUS, MSI, Gigabyte, or ASRock). - Once the BIOS screen appears, switch to Advanced Mode (often accessed by pressing
F7).
Step 2: Locate the Memory Profile Setting
Depending on your motherboard manufacturer, the option will be located in the AI Tweaker, OC (Overclocking), or Memory Settings tab:
- For Intel systems: Look for Ai Overclock Tuner (ASUS), EXPO/XMP (MSI/Gigabyte), or XMP Profile.
- For AMD systems: Look for AI Overclock Tuner set to DOCP, or locate AMD EXPO / Memory Profile.
Step 3: Select Your Profile
- Click the dropdown menu next to the profile option and select Profile 1 (or EXPO 1).
- You will notice that the target RAM frequency, primary timings (e.g., CL30 or CL36), and operating voltage (e.g., 1.35V or 1.40V) automatically update to match your RAM kit’s advertised ratings.
Step 4: Save and Exit
- Press
F10on your keyboard to Save Changes and Reset. - Confirm the prompt. Your PC will restart. Do not panic if the screen remains black for 30 to 60 seconds; your motherboard is undergoing memory training to adapt to the new high-speed profile.
4. How to Verify Your RAM Is Running at Full Speed in Windows
Once your PC boots into Windows, you need to verify that the overclock successfully applied and is running stable.
Method 1: Windows Task Manager
- Press
Ctrl + Shift + Escto open Task Manager. - Click on the Performance tab on the left, then select Memory.
- Look at the bottom-right corner for Speed (e.g.,
6000 MT/sfor DDR5 or3600 MHzfor DDR4). If it matches your kit’s box rating, the profile is active.
Method 2: CPU-Z Utility
- Download and open the free tool CPU-Z.
- Navigate to the Memory tab.
- Multiply the DRAM Frequency by 2 (since DDR stands for Double Data Rate). For instance, if CPU-Z shows ~3000 MHz, your effective speed is 6000 MT/s.
- Check the SPD tab to view detailed manufacturer specifications and verify which XMP/EXPO profile is currently loaded.
5. Troubleshooting: What to Do If Your PC Fails to Boot After Enabling XMP/EXPO
If your screen stays black, your PC gets stuck in a boot loop, or you experience blue screens (BSODs) after enabling XMP/EXPO, your CPU’s integrated memory controller (IMC) is struggling to handle the rated speed out of the box. Don’t worry—your hardware is not broken. Try these solutions:
- Clear CMOS (Reset BIOS): If your PC refuses to post, turn off the power supply, unplug the PC, and remove the coin-sized CR2032 CMOS battery from your motherboard for 3 minutes (or bridge the
JBAT1pins with a screwdriver for 5 seconds) to reset your BIOS settings to default. - Manually Bump Up DRAM Voltage: Sometimes, motherboard auto-voltages are slightly too low. If your RAM is rated for 1.35V, try manually setting the DRAM voltage in BIOS to 1.36V or 1.37V (never exceed safe manufacturer limits, e.g., 1.45V for daily DDR4 or 1.43V for standard daily DDR5 without active cooling).
- Step Down to a Lower Speed: If an aggressive kit (like DDR5-7200) fails, step down the frequency divider in BIOS one notch lower (e.g., from 7200 MT/s to 6800 MT/s) while keeping tight timings.
6. Summary Comparison Table: XMP vs. EXPO
| Feature | Intel XMP | AMD EXPO |
| Primary Platform | Intel Core (Supports Z/B series chipsets) | AMD Ryzen (Supports AM5 / X/B series) |
| Technology Base | Intel proprietary memory profile standard | AMD open-standard optimization for DDR5 |
| Sub-timings Optimized | Standard primary timings and voltage | Optimized secondary/tertiary timings for Ryzen IMC |
| Ease of Activation | One-click toggle in BIOS | One-click toggle in BIOS |
7. Expert Tips for Ultimate Memory Stability
- Run Stability Tests: Always verify memory stability after enabling XMP/EXPO. Download free tools like TestMem5 (TM5) with custom configs (like 1usmus) or OCCT and run a 30-minute stress test to ensure zero errors.
- Check CPU Cooler Mounting Pressure: Uneven or overly tight CPU cooler mounting pressure can warp the motherboard socket, causing intermittent connection loss on memory channels. If your outer RAM slots stop working, slightly loosen your CPU cooler screws.
- Keep Your Kit Matched: Never mix and match different RAM kits—even if they share the exact same brand and speed. Always buy a single unified kit to guarantee stable XMP/EXPO compatibility.
8. Frequently Asked Questions (FAQ)
1. Will enabling XMP or EXPO void my hardware warranty?
Intel and AMD officially classify XMP and EXPO as overclocking, meaning it technically falls outside baseline JEDEC specifications. However, in practice, hardware manufacturers almost never deny warranties for using these standard profiles.
2. Why is my RAM running slower in Task Manager than what is printed on the box?
Because your motherboard defaults to safe JEDEC speeds until you manually enable XMP or EXPO in the BIOS.
3. Can I use Intel XMP RAM on an AMD motherboard?
Yes! Many motherboard manufacturers allow XMP profiles to run on AMD platforms, though selecting a kit explicitly certified with an AMD EXPO profile ensures optimal sub-timing compatibility.
4. What happens if my PC crashes after enabling XMP?
Your CPU’s memory controller cannot handle the rated speed stable. You will need to clear your CMOS to reset the BIOS and either tweak voltages or step down the speed slightly.
5. Does memory overclocking increase gaming performance?
Yes, especially in CPU-bound competitive games (Counter-Strike 2, Cyberpunk 2077, Valorant), faster RAM bandwidth and tighter timings significantly boost minimum frame rates (1% lows).
6. Is it safe to leave XMP/EXPO enabled 24/7?
Absolutely. XMP and EXPO use factory-vetted voltages and timings engineered to run safely for the lifetime of the hardware under normal cooling conditions.
7. Why does my PC take longer to boot up after enabling EXPO?
This is caused by Memory Context Restore or RAM training cycles where the motherboard tests stability during boot. You can enable Memory Context Restore in modern BIOS to drastically speed up boot times.
8. Do I need to update my BIOS before enabling XMP or EXPO?
It is highly recommended. Modern BIOS updates continuously improve memory compatibility tables, allowing higher-speed kits to run stably.
9. Can I enable XMP inside Windows using software?
Some motherboard companion apps (like ASUS Armoury Crate or MSI Center) let you toggle profiles in Windows, but it is always safer and more reliable to configure it directly in the BIOS.
10. What is the “Gear Mode” setting for Intel memory overclocking?
Gear Mode (Gear 1 vs. Gear 2) dictates the ratio at which the memory controller runs relative to the RAM frequency. Gear 1 offers lower latency for moderate speeds, while Gear 2 is required to stabilize ultra-high frequency DDR5 kits.
9. Conclusion
Enabling Intel XMP or AMD EXPO is the single easiest, highest-value performance tweak you can perform on a custom gaming PC. By following this guide, you can unlock your memory’s true potential in minutes, boosting frame rates and system responsiveness without risking your hardware.
Leave a Reply