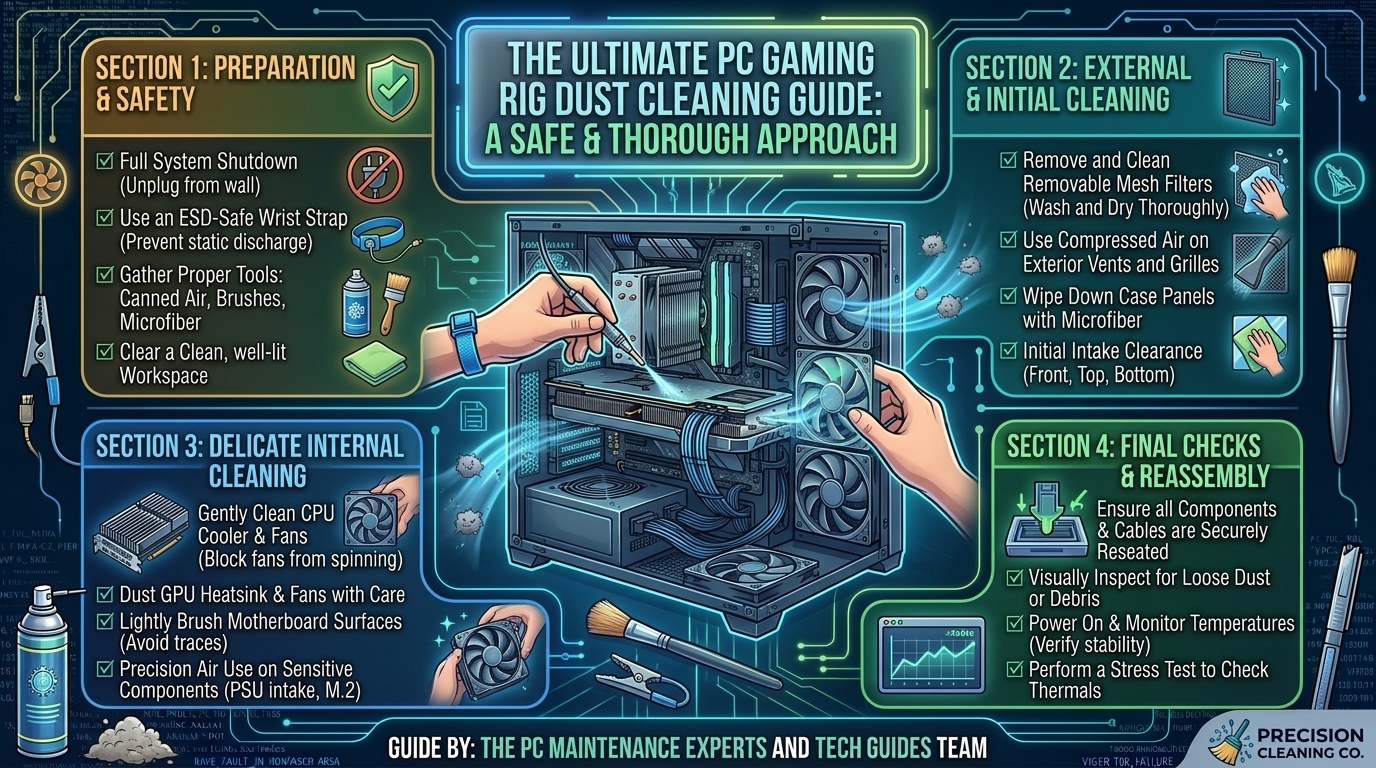
How to Properly Clean Dust Out of Your PC Gaming Rig Without Damaging Delicate Internal Computer Components
Accumulated dust is one of the leading silent killers of gaming PC performance and hardware longevity. Over months of high-FPS gaming, your case fans pull in ambient household dust, pet dander, micro-particles, and debris. This dust settles directly onto heatsinks, graphics card backplates, radiator fins, and motherboard components.
When dust blankets critical components, it forms an insulating thermal barrier. Your CPU and GPU can no longer dissipate heat effectively, forcing fan speeds to skyrocket, core clocks to throttle, and system noise to increase. Left unchecked, excessive heat density and static-charged dust build-up can shorten component lifespans or cause hardware failure.
This comprehensive guide covers everything you need to safely clean your gaming PC: essential safety protocols, required tools, step-by-step disassembly workflows, deep-cleaning techniques, and preventative airflow strategies.
Cleaning Frequency & Risk Assessment Matrix
Before opening your PC case, review this maintenance timeline and component vulnerability guide to understand where extra care is required:
| Component | Risk Level | Recommended Interval | Key Hazard / Primary Precaution |
| Case Dust Filters | Low | Every 2–4 Weeks | Restricts airflow. Wash with water (must be 100% dry before reinstallation). |
| Case Fans & Blades | Medium | Every 1–3 Months | Spin hazard. Over-spinning fans with compressed air can wreck bearings or generate back-EMF voltage. |
| GPU Heatsink & Fans | High | Every 3–6 Months | Delicate surface components (SMDs) and sensitive fan bearings. Never blast air up close. |
| CPU Cooler / AIO Radiator | Medium | Every 3–6 Months | Dust clogs tight aluminum fins. Block fan blades while blowing out radiator channels. |
| Motherboard & RAM | High | Every 6 Months | ESD Hazard. Avoid touching circuit traces or CPU socket pins with vacuum nozzles or brushes. |
| Power Supply Unit (PSU) | CRITICAL | Every 6–12 Months | Internal High Voltage. Clean externally using air ONLY; NEVER open the PSU casing. |
1. Essential Tools & Safety Gear (What to Use vs. What to Avoid)
Using the wrong cleaning equipment is the leading cause of accidental component damage during maintenance.
Approved Cleaning Tools:
- Compressed Air Cans (Dedicated Electronics Duster): Great for short, controlled bursts of air.
- Electric ESD-Safe Air Duster / Blower: An eco-friendly alternative to canned air that delivers steady air pressure without chemical propellants or moisture risk.
- 99% Isopropyl Alcohol (IPA): High-purity alcohol evaporates instantly and leaves zero conductive residue. Perfect for cleaning thermal paste, fan blades, and PCB surfaces. (Avoid 70% IPA, as its water content can cause short circuits).
- Microfiber Cloths (Lint-Free): Traps dust without scratching acrylic or tempered glass panels.
- Anti-Static (ESD) Soft-Bristle Brushes: Ideal for gently dislodging stubborn dust stuck between heatsink fins or capacitors.
- Wooden Toothpicks or Cable Ties: Used to hold fan blades motionless while blowing out dust.
BANNED Equipment (NEVER Use These):
- ❌ Standard Household Vacuum Cleaner Nozzles: Plastic vacuum nozzles build up massive static electricity charges. Touching a motherboard or GPU with a household vacuum nozzle can kill components via Electrostatic Discharge (ESD).
- ❌ Standard Feather Dusters or Paint Brushes: Generates static friction and leaves conductive synthetic fibers behind.
- ❌ Water, Glass Cleaners, or Household Detergents: Using water or glass cleaners on bare circuit boards causes corrosion, shorts, and permanent failure.
- ❌ Air Compressors with Air Tanks: Standard workshop compressors collect moisture inside their tanks. Blasting your PC with a workshop compressor can spray liquid water and oil droplets directly onto your motherboard.
[ SAFE TOOLS ]                               [ UNSAFE TOOLS ]
- Electric ESD Duster / Canned Air           - Household Vacuum Cleaners
- 99% Isopropyl Alcohol (IPA)                - Water / Windex / Household Cleaners
- Anti-Static Soft Brushes                   - Workshop Compressors (Moisture Risk)
- Microfiber Cloths                          - Feather Dusters / Synthetic Brushes
2. Critical Pre-Cleaning Safety Protocols
Before touching a single screw on your system, follow this mandatory safety routine to protect both yourself and your hardware:
- Power Down Complete: Shut down Windows completely (
Start > Power > Shut down). - Flip the PSU Toggle Switch: Switch the toggle on the back of your Power Supply Unit to the “0” (OFF) position.
- Unplug the AC Power Cable: Disconnect the main power cord from the wall outlet or surge protector.
- Discharge Residual Capacitance: Press and hold the PC’s physical Power Button on the front case for 10–15 seconds. You may see case LEDs flash briefly; this drains remaining power stored in the motherboard and PSU capacitors.
- Disconnect Peripheral Cables: Unplug all DisplayPort/HDMI cables, USB peripherals, network cables, and audio jacks.
- Establish ESD Grounding: Move your PC to a hard flat surface (wooden table or anti-static mat). Avoid working on carpets, rugs, or wearing wool socks, as these build up static charges rapidly. Touch a grounded metal object (like a bare metal table leg or unpainted PC chassis area) before touching internal components.
3. Step-by-Step PC Deep Cleaning Workflow
Follow this logical sequence to clean your system from the outside in without spreading dust back into cleaned areas.
[ 1. Outer Filters & Panels ] ---> [ 2. Internal Disassembly ] ---> [ 3. Case & Radiator Blowout ]
                                                                             |
[ 6. Reassembly & Inspection ] <--- [ 5. CPU/GPU Thermal Maintenance ] <--- [ 4. Deep Component Cleaning ]
Step 3.1: External Dust Filters and Glass Panels
- Remove the top, front, and bottom power supply dust filters.
- Blow off heavy dust outdoors using canned air or an electric duster. If filters are heavily caked, rinse them under lukewarm water. Crucial: Let filters air-dry completely for 12–24 hours before reinstalling.
- Clean tempered glass side panels using a microfiber cloth lightly dampened with glass cleaner (apply cleaner to the cloth, never directly onto the PC).
Step 3.2: Dismantling Key Components for Access
Working inside a cramped chassis makes thorough cleaning difficult. Removing key components improves access and prevents dust from settling into slots:
- Carefully remove the primary Graphics Card (GPU) by unscrewing the PCIe bracket screws, releasing the PCIe slot retention latch, and disconnecting PCIe power cables.
- Remove RAM modules by pressing down the slot retention clips.
- Keep the CPU and CPU cooler mounted unless you plan to replace thermal paste.
Step 3.3: Cleaning Radiators, Heatsinks, and Fans
The golden rule of cleaning fans: Always immobilize the blades.
Why You Must Hold Fan Blades Still:
When high-pressure air spins a cooling fan past its design RPM, two things happen:
- It can over-torque and ruin the sleeve or fluid dynamic bearings.
- Electric motors act as generators in reverse. Spinning a fan blade manually sends an electrical current (Back-EMF) back through the fan header directly into your motherboard, which can fry delicate fan controller ICs.
- Insert a wooden toothpick or hold fan blades stationary with your finger.
- Hold canned air upright (never tilt or turn cans upside down, or liquid freezing propellant will spray out).
- Use short, controlled bursts of air to blast dust through heatsink fins, AIO liquid cooling radiators, and fan housing frames.
- Wipe fan blade edges clean using a microfiber cloth lightly dampened with 99% Isopropyl Alcohol to remove caked-on dust grime.
Correct Method:  [ Toothpick / Finger Holding Blades Still ] + [ Short Air Bursts 4-6 Inches Away ]
Incorrect Method: [ Blasting Air Directly at Free-Spinning Fans ] -> Risk of Bearing & Electrical Damage
Step 3.4: Cleaning Motherboard, RAM, and Expansion Slots
- Use an electric duster or canned air held 6–8 inches away to blow dust off the motherboard surface, working from top to bottom.
- Use a soft anti-static brush to loosen dust trapped around capacitors, M.2 heatsink channels, and power delivery (VRM) heatsinks.
- Spray short bursts of air into PCIe slots and RAM DIMM slots to clear out settled debris. Clean RAM gold contacts using a lint-free microfiber cloth dipped in 99% IPA.
Step 3.5: Power Supply Unit (PSU) Maintenance
- SAFETY WARNING: Never disassemble the metal casing of your Power Supply Unit. Internal high-voltage capacitors can hold lethal charges for days, even when completely unplugged.
- Insert a non-conductive object (like a wooden chopstick or plastic zip tie) through the PSU fan grill to hold the internal fan blade still.
- Use short bursts of compressed air from the outside to blow dust out through the honeycomb ventilation holes.
4. GPU Thermal Maintenance (Advanced Deep Clean)
If your graphics card is more than 2–3 years old and running hot despite clean heatsink fins, the internal thermal paste may have dried out and cracked.
- Remove the GPU backplate screws carefully in a diagonal star pattern.
- Gently separate the PCB from the heatsink assembly (take care not to tear delicate fan/RGB header cables).
- Clean old, hardened thermal paste off the GPU die using a lint-free microfiber cloth and 99% Isopropyl Alcohol.
- Apply a fresh dot or X-pattern of high-viscosity thermal paste (like Arctic MX-6, Thermal Grizzly Kryonaut, or Noctua NT-H2) to the GPU core die.
- Realign thermal pads over VRAM chips and MOSFETs (replace damaged or torn pads with matching thickness pads).
- Reassemble the GPU heatsink and tighten screws evenly in a cross pattern.
5. Preventative Airflow Maintenance (Positive Static Pressure)
To keep your system cleaner for longer, configure your case fan setup for Positive Static Pressure:
POSITIVE PRESSURE SETUP (Recommended):
[ Front/Bottom Intake Fans (Filtered) ] >>> Air In > Air Out >>> [ Top/Rear Exhaust Fans ]
(More filtered intake volume than exhaust volume prevents dust from leaking through unsealed cracks)
- Positive Pressure (Intake > Exhaust): You have more fans pulling air into the case through dust filters than fans pushing air out. Air naturally escapes out through unfiltered mesh cracks and PCIe slots, preventing ambient room dust from getting pulled in.
- Negative Pressure (Exhaust > Intake): More fans pushing air out than pulling in. This creates a vacuum inside the chassis that pulls unfiltered, dusty air in through every unsealed panel seam and rear port.
- Elevate Your PC: Keep your PC chassis off carpeted floors using a PC stand, desk mount, or hard wooden surface. Carpet placement causes bottom PSU intake fans to pull in heavy carpet fibers and floor dust.
Cleaning Checklist Summary
+---------------------------------------------------------------------------------+
|                       PC GAMING RIG CLEANING CHECKLIST                          |
+---------------------------------------------------------------------------------+
| [ ] System powered off, PSU switch toggled OFF, power cord unplugged            |
| [ ] Front power button held for 15s to discharge residual electrical power      |
| [ ] Grounded self against ESD; working on hard wooden surface (no carpet)       |
| [ ] Air filters removed and cleaned (fully dried before reinstallation)         |
| [ ] Fan blades immobilized (holding still) during compressed air blowout        |
| [ ] Motherboard, PCIe slots, and VRM heatsinks cleared of dust buildup          |
| [ ] Canned air held upright (no liquid freezing propellant sprayed)             |
| [ ] PSU cleaned EXTERNALLY only (never opening the PSU casing)                  |
| [ ] GPU and RAM re-seated firmly; all PCIe power latches secured                |
+---------------------------------------------------------------------------------+
Frequently Asked Questions (FAQ)
Q1: How often should I clean dust out of my gaming PC?
A: A basic cleaning (dust filters and quick air blowout) should be done every 1–3 months. A comprehensive deep cleaning (removing the GPU, clearing fan blades, and wiping down surfaces) is recommended every 6–12 months depending on household dust levels and pet ownership.
Q2: Can using compressed air damage my computer parts?
A: Yes, if used improperly. Holding cans upside down sprays liquid freezing propellant that can thermally shock glass or components. Additionally, allowing compressed air to over-spin fan blades can damage bearings or send back-voltage into motherboard fan headers. Always hold cans upright and hold fan blades motionless.
Q3: Is it safe to use a hairdryer to blow dust out of a PC?
A: No. Hairdryers generate hot air that can warp thin plastic fan blades, melt thermal pads, or degrade components. They also build up static electricity along the plastic nozzle, posing an ESD hazard.
Q4: What should I do if liquid propellant sprays out of my compressed air can onto a component?
A: Do not panic or power on the PC. The liquid propellant (usually difluoroethane) evaporates quickly, but it freezes the surface instantly. Allow the component to return to room temperature completely and wait at least 30–60 minutes for all moisture to evaporate before applying power.
Q5: Will opening my PC case to clean it void my warranty?
A: No. Pre-built system vendors and custom PC builders expect users to perform regular maintenance. However, damaging components physically (like snapping a PCIe latch or opening a PSU casing) will void component warranties.
Q6: Can I use 70% Rubbing Alcohol instead of 99% Isopropyl Alcohol?
A: It is strongly discouraged. 70% alcohol contains 30% water, which takes significantly longer to evaporate and can pool underneath surface-mount components, leading to corrosion or short circuits. Always use 99% pure Isopropyl Alcohol for electronics.
Q7: Why are my CPU and GPU temperatures still high after cleaning all the dust out?
A: If air passages are clean but thermal performance remains poor, your thermal paste between the processor and heatsink has likely dried out and lost thermal conductivity. Replacing dried thermal paste with a fresh application usually resolves persistent high temperatures.
Q8: How do I remove stubborn, sticky dust from fan blades?
A: Dust mixed with oil or humidity creates a sticky film that air alone cannot remove. Dip a cotton swab or microfiber cloth in 99% Isopropyl Alcohol and gently wipe each fan blade clean individually.
Q9: Is a leaf blower or air compressor safe if I stand far away?
A: No. Standard air compressors can output oil and condensed water vapor stored in their tanks. Leaf blowers lack ESD grounding and produce excessive static. Stick to dedicated, ESD-safe electric duster blowers designed specifically for electronics.
Q10: Should I replace dust filters if they are damaged or torn?
A: Yes. Damaged or warped dust filters allow fine dust directly into your intake fans. Inexpensive magnetic aftermarket dust filters can be purchased online to replace missing or damaged stock filters.
Conclusion
Properly cleaning dust out of your PC gaming rig is one of the easiest ways to preserve hardware stability, maintain low thermal output, and protect expensive components from premature failure. By using ESD-safe tools, immobilizing fan blades during blowout routines, avoiding dangerous cleaning methods like household vacuums, and maintaining a positive-pressure airflow environment, your gaming rig will stay cool, quiet, and perform at its best for years to come.
Leave a Reply